Showing posts sorted by relevance for query willy. Sort by date Show all posts

Thursday, February 9, 2012

Claudia Roden's orange and almond cake

When you're as food-obsessed as I am, it makes sense to surround yourself with people on your wavelength, so it comes as no surprise that some of my closest friends also happen to be excellent cooks/bakers/snackers. My adventures in cooking with my pal Gideon have been widely chronicled on this site. Patricia, who sadly lives in France nowadays, is the queen of hosting potlucks, and Mathilde, who lives in New York but hails from Paris, is the master of the quiche and makes a mean crêpe, to boot. Just to mention France one more time, Bonnie and I founded a dinner club together with our friends in Toulouse last year, and I think it's safe to say that her dinners were the most heavily anticipated--she made a mapo dofu last Chinese New Year that blew my mind (and, to a certain extent, my tongue--those Sichuan peppercorns can be fiery!) Despite all these heavyweight contenders, I think it's actually my friend Willy who can go head to head with me in terms of food fixation. He and I cook together all the time, and when I need a culinary companion for a far-flung peregrination to Queens or deep south Brooklyn, he's usually game to make the trek with me.

Willy also happens to be an excellent baker. He's prepared my birthday cakes sever
al times--this past year, it was a white layer cake filled with homemade raspberry jam and draped with homemade marzipan. His no-knead bread, which he makes routinely, puts mine to shame, and I've also tasted potato bread, rye bread, and Anadama bread that he's made. A few months ago, I was over at Willy's for lunch, and for dessert he served a beguiling orange and almond cake the likes of which I had never tasted: it had a ton of texture from the ground almonds, a powerful perfume from the oranges, and an underlying bitterness to complement its sweetness. What most attracted me about this cake, though, was the unusual way in which it was made: Willy told me that to make the batter, he boiled two whole oranges for hours, then ground them up, peels and all, to incorporate into the cake mix. That slight bitterness I tasted was coming from the orange pith. I loved the idea of this recipe, and I had to try it.

Several weeks later, I found the occasion to make it: I was attending a Rosh Hashanah dinner at my cousins' house in New Jersey, and I volunteere
d to bring a dessert. I picked up the ingredients I knew I would need, and then called Willy to confirm the method of preparation. As I simmered the oranges in boiling water, an intense, almost incense-like fragrance filled my apartment. I couldn't wait to taste this cake. When the oranges were ready, I puréed them in the food processor, then set them in the fridge to cool as I worked through the rest of the recipe: grinding the almonds, separating the eggs. Then I put the whole thing together, poured it into a pan, and slid it into the oven to bake.

All that work had made me hungry, so I peered into the fridge to see what I could make myself for lunch. And that's when I saw it: that bright, vivid, luscious-smelling orange purée, still cooling in my fridge. Very distinctly not baking in my cake. My heart fell. Who needs a plain old almond cake? I thought. It's been done!

When my boring, stupid almond cake emerged from the oven about 45 minutes later, I tried to salvage the situation. I mixed some of the orange
purée with some water and sugar, in an attempt to make a glaze. I poked some holes in the still-warm cake and brushed on the glaze, hoping that it would imbue the cake with its citrusy freshness. And in the end, of course, the cake was fine--but it barely tasted of orange. It lacked that exotic quality that the cake I'd tasted at Willy's had in spades.

Luckily, I was able, through my haze of anger, to have the foresight to stick the rest of the unused orange purée in a container in the freezer, to be deployed at some other time. I finally got my chance this past weekend, when my brother hosted a cassoulet party at our parents' house. Bravely, I volunteered, yet again, to bring dessert. I went through all the same steps, but of course, this time I remembered to include that precious orange purée in my confection. I also adjusted the cooking time and temperature a little bit, remembering that while Willy's cake had a more crumbly texture, I was looking for a softer one in mine. And I'm happy to report that the end result was just as glorious I had hoped for all those many months ago when I first made the cake: moist, fragrant and vivid in color from the orange peel and egg yolks, this cake truly has the power to transport you to the Middle East.


Middle Eastern Orange and Almond Cake

Adapted slightly from this recipe
Makes one cake

Ingredients:

- 2 oranges
- 6 eggs, separated
- 1 1/2 c. ground almonds
- 1 c. sugar
- 1 tsp. baking powder
- 1/2 tsp. vanilla extract
- 1/2 tsp. almond extract
- 1/2 tsp. ground cinnamon
- 1/2 tsp. salt

Preparation:

1. Preheat the oven to 375°. Prepare a medium spring form pan: butter the bottom and sprinkle with additional almond meal.
2.
Wash oranges thoroughly, place them in a pot, cover with water and boil for 2 hours. Remove from water, cut open and remove seeds, then purée in a food processor until completely smooth. Set aside.
3. Combine ground almonds, orange purée, egg yolks, sugar, baking powder, vanilla, almond extract, cinnamon, and salt in a large bowl, mixing well.
4. Whip egg whites to somewhere between soft and stiff peaks. Fold gently, in two batches, into the yolk mixture. Pour into prepared pan and bake for 45 minutes or until top is well browned but center still appears moist.

Saturday, July 11, 2009

Food & Wine, Patrick & Willy

About a month ago (this post, like most of my posts recently, is long overdue--hey, it's summer!), Patrick and Willy came over for yet another one of our dinners. It so happened that at work at Food & Wine that day I picked up the July issue of the magazine, thumbed through it, and found about a million recipes I wanted to try. I settled, though, on one that sounded perfect for a hot, humid day: Za'atar Flatbreads with Cucumber-Yogurt Salad. Za'atar (or zatar), a Middle Eastern spice blend that usually contains crushed sumac, dried thyme, and sesame seeds, is one of my very favorite ingredients, but I had only ever eaten it in restaurants and had never before cooked with it. But, like they say, there's no time like the present--or, at this point, the recent past. I promptly dog-eared the recipe, and, on my lunch break, strode the few blocks over to the market in Grand Central and, more specifically, to the Penzey's Spices stall therein. I grabbed a bottle of zatar and was halfway to having dinner on the table.

Well, maybe not quite halfway. But the rest of the recipe was remarkably simple. When I got home from work, I stopped into Peppe's, one of the many respectable pizzerias in my neighborhood, and picked up a round of pizza dough for $3. At home, I pounded it out, oiled it, and slapped it on a very hot charcoal grill, spooning a mixture of zatar and olive oil on the side facing up. About 6 minutes later, we had hot, yeasty bread that was perfect for scooping up the verdant, cooling accompanying salad of cucumber, spinach and peas bound together with Greek-style yogurt:


To round out the vegetarian menu, I prepared another dish courtesy of Food & Wine: a green bean, roasted red pepper and cherry tomato salad that I had sampled in the test kitchen earlier that week. Brightened up with fresh thyme and basil from my garden and topped with crunchy, nutty toasted almonds, the salad perfectly rounded out the evening's menu:


I'd say everyone was pleased, particularly Willy:


Za'atar Flatbreads with Cucumber-Yogurt Salad
Adapted from foodandwine.com
Serves 6

Ingredients:

All-purpose flour, for dusting
12 oz. prepared pizza dough, divided into 2 pieces
5 oz. baby spinach
1/2 cup frozen baby peas, thawed
1 cup peeled and finely diced cucumber
2 tbsp. chopped parsley
2 tbsp. chopped mint
2 tbsp. chopped dill
2 tsp. minced garlic
One 17-oz. container Greek-style plain whole-milk yogurt
1 tbsp. fresh lemon juice
1/2 cup extra-virgin olive oil
2 cups shredded romaine lettuce
Kosher salt
1/2 cup za’atar spice mix

Preparation:

1. Preheat the oven to 450° and place a pizza stone on the bottom rack to heat for 30 minutes. Alternatively, light a charcoal grill or heat a gas grill on high.
2. On a lightly floured work surface, flatten the pizza dough into two 9-inch rounds, about 1/4 inch thick; transfer to 2 well-floured pizza peels or inverted baking sheets. Let stand until slightly risen, 20 minutes.
3. Meanwhile, in a large saucepan, wilt the spinach with 1 tablespoon of water over high heat. Transfer to a colander and rinse with cold water. Squeeze out the liquid and chop the spinach; transfer to a bowl. Add the peas and mash lightly with a fork. Stir in the cucumber, parsley, mint, dill and garlic. Add the yogurt, lemon juice and 2 tbsp. olive oil and stir to combine. Fold in the romaine and season with salt.
4. In a bowl, combine the za’atar with the remaining oil and a generous pinch of salt.
5. Shake the pizza peel a few times to loosen the dough. Dust flour under any areas that stick. Spread the za’atar oil over the dough. Slide the rounds onto the hot stone and bake for 10 minutes, until golden and crisp. To grill the flatbreads, oil one side lightly and flip that side onto the hot grill. Spread the za'atar oil over the side facing up. Grill for about 6 to 8 minutes.
6. Transfer the breads to a work surface and cut into wedges. Serve with the cucumber yogurt.

Green Bean, Roasted Red Pepper and Cherry Tomato Salad with Toasted Almonds
Serves 4
My improvised version of a Food & Wine test kitchen recipe

1. Preheat the oven to 425°. Lightly coat 2 red bell peppers in oil and place in the oven on a baking pan to roast until they are soft and their skins are blackened, turning occasionally, about 14 - 16 minutes. During the last few minutes of cooking, place a large handful of whole, preferably blanched almonds on a small baking pan and toast in the oven. Remove peppers from oven and place in a bowl. Cover the bowl with a tight layer of plastic wrap and set aside to cool. Remove almonds from oven and set aside to cool.
2. Blanch one pound of trimmed green beans in a shallow pan of salted water until bright green and still crisp, about 4 - 6 minutes. Drain and run under cold water to stop the cooking. Place green beans in a large bowl.
3. When peppers are cool enough to handle, peel skin from them, open them up and remove their seeds. Slice peppers into strips and add them to the bowl with the green beans.
4. Cut one pint of cherry tomatoes into quarters or halve one pint of grape tomatoes. Add tomatoes to bowl.
5. Dress salad with a mixture of lemon juice, red wine vinegar, olive oil, salt and pepper, to taste. Add generous handfuls of chopped fresh herbs, such as thyme and basil, and mix well.
6. Coarsely chop the almonds and sprinkle them over the salad. Divide between four plates and serve.

Sunday, May 3, 2009

A discussion of fashion, fueled by frittata

Last week marked the third installment of my semi-regular dinners with my friends Willy and Patrick, whereby, in exchange for my home cooking, the two provide some type of refreshing alcoholic beverage and a dessert of some kind (preferably a selection of 35¢ Big Boy ice cream sandwiches). Being that Patrick is a vegetarian, these dinners challenge my creativity in the kitchen (which, for me, is great fun). Although I often cook and enjoy meat-free meals for myself, I feel that the ante is upped when I prepare them for a bona fide vegetarian: it's on me to make a filling and well-rounded plate that will satisfy someone who has eaten all manner of vegetarian creations, and knows what's good and what's not.

I can't speak for vegetarians, but as someone who cooks, I truly feel that eggs are the saving grace when it comes to meat-free meals. As I mentally ran through a variety of menu options for my dinner with the guys, I kept settling on things like pasta (which I had made for both of the other dinners: first with roasted vegetables and then with potatoes and pesto), some sort of Asian rice or noodle dish, or dishes founded on potatoes (something like, for example, colcannon ). I was thinking about starch, not about protein. And then suddenly I remembered that I had a nearly-full carton of eggs in my fridge that needed to be used up. I felt immensely relieved: yes, that will be tasty! Yes, that will be filling!

Once I had settled on making an egg dish, the rest of my plans fell into place quite naturally. Minimally intensive and maximally satisfying, a frittata fit the bill. Almost anything goes in a frittata--that's what makes it such a perfect food--but I decided to pack mine, this time, with potatoes, red peppers and spinach, three ingredients that I view as natural matches for each other. On the side, I prepared a quick garlic bread (simply a baguette, halved lengthwise, brushed with garlic-infused olive oil, sprinkled with salt, and toasted in the oven) as well as a salad of fresh baby spinach (left over from the frittata-making), peppery arugula, thinly sliced apples and toasted walnuts. Dinner conversation covered a range of topics, from opinions on men wearing V-necks (unanimously opposed), to anyone, man or woman, wearing shorts (Patrick and Willy approved; I demurred), to the greatness of the band the Vaselines and of trips outside of New York City. We didn't really talk about the food, but I think that the empty bread plate, the empty salad bowl, the nearly empty frittata pan (save for two slices) and the three empty ice cream sandwich wrappers spoke to our enjoyment of the dinner.


Potato, Red Pepper and Spinach Fritatta
Makes 8 wedges

1. Wash 3 large or 4 small waxy (new) potatoes. Cut them into bite-size pieces and place them in a small pot. Fill pot with enough cold water to just cover potatoes. Cover the pot and set it over high heat to bring water to a boil, then drop heat to medium and allow potatoes to cook at a low boil until tender, about 6 minutes more. Drain the potatoes.
2. Meanwhile, rinse one large red bell pepper and cut it open to remove seeds and ribs. Slice the pepper into long, thin strips and cook them slowly in about 2 tbsp. of olive oil in a deep, wide pan (preferably a 10" cast-iron skillet) set over medium heat. Season strips with salt and pepper and stir occasionally. The strips are done when they are tender and well-browned, about 15 - 18 minutes.
3. Increase the heat under the skillet of peppers to medium and begin to add handfuls of well-washed baby spinach or regular spinach, torn, to the pan. Season with salt and stir, allowing the spinach to wilt. Add about 5 cups of raw spinach; it will cook down to about 1 1/2 cups.
4. Add diced potatoes to the pan and stir to combine.
5. Meanwhile, beat 8 large eggs in a bowl, seasoning them with salt and pepper. Additionally, grate 1 cup of semifirm mild cheese, like Idiziabal, Manchego or Gruyere, and set aside.
6. Add about 1 tbsp. more olive oil to the pan and tilt to coat the bottom. Set flat and arrange vegetables in an even layer over the bottom of the pan. With the pan over medium heat, pour in the beaten eggs. Stir them only occasionally, so that they begin to set. Using a rubber spatula or wooden spoon, pull the outer, set layer of eggs into the middle of the pan, and repeat.
7. When eggs begin to set more firmly, add the cheese, sprinkling it evenly over the eggs and stirring to combine. Preheat your oven's broiler. When it is hot, slide the skillet underneath and cook until the top of the fritatta is set and browned. Watch it closely! This should take about 4 - 6 minutes but may happen more quickly if your broiler is especially hot.
8. Remove the skillet from the oven and slice it into 8 wedges. Serve hot, warm or cold. We enjoyed the fritatta hot when I first made it and it was delicious, but when I ate it cold from the refrigerator the next day it was also great because I could taste the cheese more distinctly.


Spinach and Arugula Salad with Apples and Toasted Walnuts
Serves 4

1. Thoroughly wash and dry 1 large bunch of baby spinach. Pick off large or tough stems and place the spinach in a large bowl.
2. Thoroughly wash and dry 1 large bunch of arugula. Pick off large or tough stems and either tear or slice the arugula into wide ribbons. Place in the bowl.
3. Core 1 tart green apple and cut it into wedges. Slice each wedge into about 8 or 10 very thin slices and add them to the bowl.
4. Toast about 3/4 cup walnuts, either in a small pan over medium heat or in a 300° oven, for about 6 minutes. Let cool completely. Add to bowl.
5. Prepare a simple vinaigrette for the salad. Stir together a mix of red wine vinegar and balsamic vinegar (about 1/3 cup total) with salt and pepper. Whisk in about 1/2 cup extra virgin olive oil. Pour mixture over salad and toss until evenly coated. Serve at once.

Monday, February 13, 2012

More fun with chickpeas

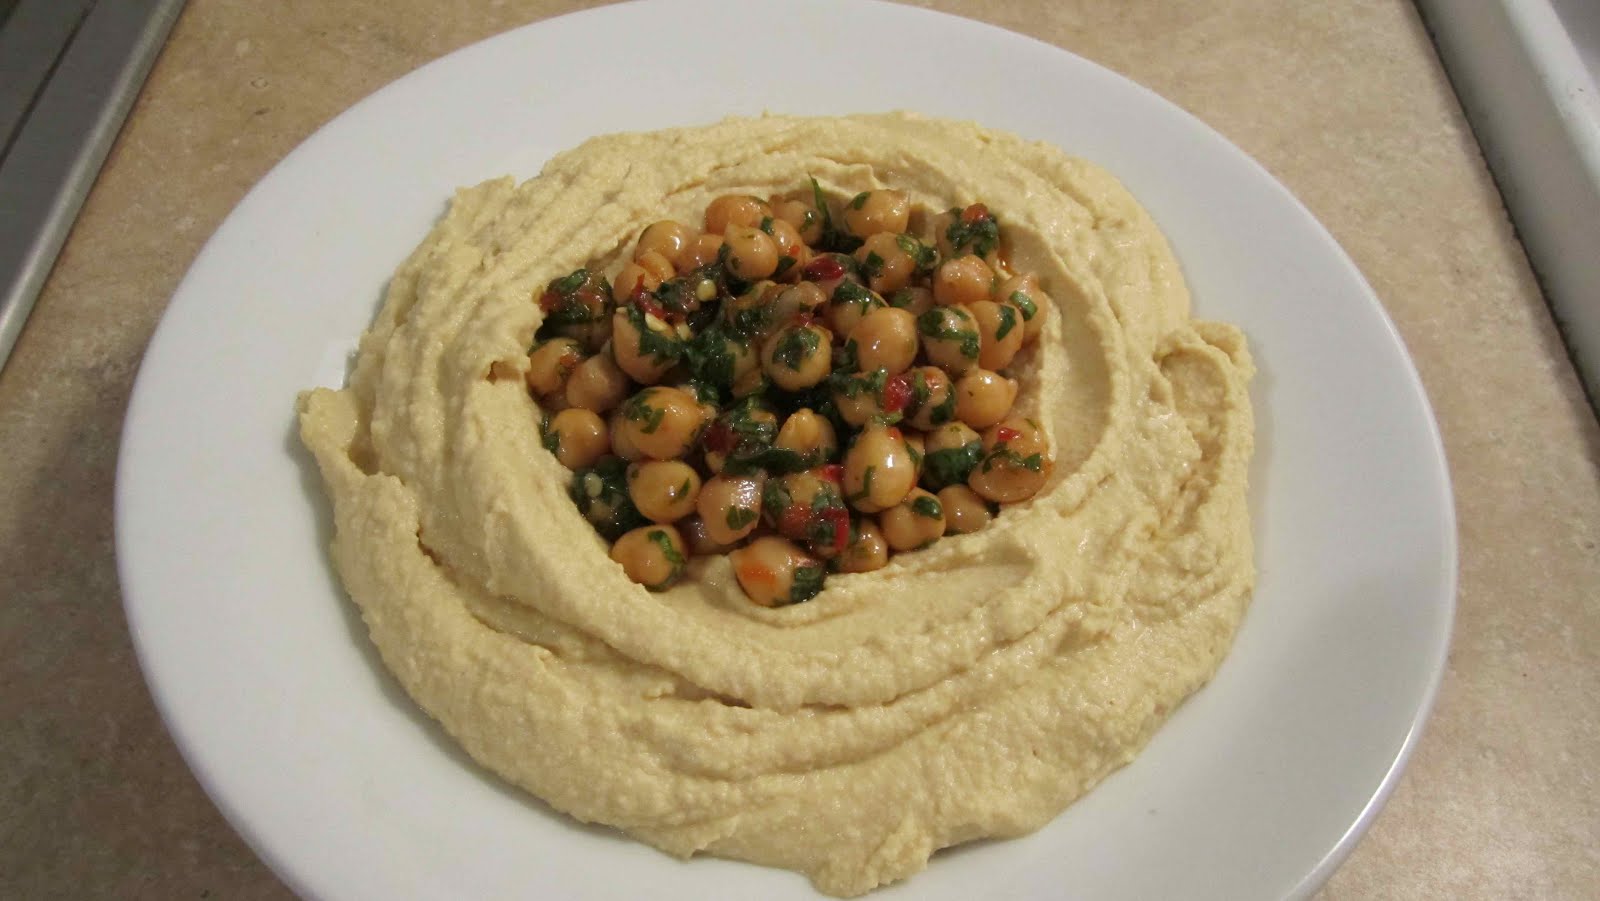
My friend Mathilde's birthday was last Friday, and we had a small party to celebrate. As is usual, when we gather at Willy's house, food played a supporting starring role. As a sort of group effort, we all pitched in to make a big pot of tortilla soup with all the fixins, Willy made another ridiculously intricate and delicious layer cake, and I decided to contribute some hummus that I prepared at home earlier in the day. Inspired by my recent success cooking with dried, soaked chickpeas, I decided to go that route with my hummus, in lieu of canned garbanzos. I soaked and cooked some more chickpeas, then drained them, reserving the cooking liquid. I tipped most of the legumes into my food processor, keeping back about a cup of them, and made my standard hummus by adding garlic, tahini, lemon juice, olive oil and some of the cooking liquid. After tasting and adjusting the flavors to my liking, I let the food processor run for a long time, whipping the hummus into a dense, silky purée. The dried chickpeas contribute a better texture and a fuller flavor to the spread.

My favorite part about this dish, though, is what I decided to do with the remaining, whole chickpeas. Recalling a recent trip to Mimi's Hummus in Ditmas Park, where I ate a fava bean hummus garnished with some whole favas, I knew that I wanted some textural contrast in my hummus. So I marinated the remaining chickpeas in a mix of sambal oelek (my favorite all-purpose hot sauce--you can use sriracha, harissa, or whatever chile paste you prefer), olive oil, and chopped fresh cilantro and parsely. When I served the hummus, I made a well in the spread and lay the whole chickpeas in the middle. The super smooth hummus, broken up by the toothsome whole chickpeas, makes a winning legume-on-legume combination:


Hummus with Whole Marinated Chickpeas

Serves 8 - 10 as an appetizer

Ingredients:

- 1 1/2 c. dried chickpeas, soaked overnight then cooked for about 1 hour, or until soft, drained, cooking liquid reserved--or use about 3 c. canned
- 2 cloves garlic, smashed and peeled
- About 2 tbsp. tahini
- The juice of about 2 lemons
- About 4 tbsp. cooking liquid
- About 4 tbsp. olive oil, plus more for marinated chickpeas
- Salt, to taste
- About 1 tbsp. hot chile paste such as sambal oelek, sriracha, or harissa
- 1 - 2 tbsp. chopped fresh parsley, cilantro or both

Preparation:

1. Add all but about 3/4 c. chickpeas to bowl of a food processor. Add garlic and pulse to combine.
2. Add tahini, lemon juice and salt and turn machine on. As it is running, pour the cooking liquid and olive oil in through the spout on top. Check for seasoning, adjusting as needed, then leave machine running for about 3 minutes so that hummus becomes very smooth.
3. In the meantime, prepare the marinated chickpeas: combine them with the chile paste, about 1 tbsp. of additional oil, fresh herbs, and salt. If possible, let marinate for 30 minutes to an hour.
4. When ready to serve, spread hummus into a shallow bowl and create a well in the middle. Add marinated chickpeas, drizzle with additional olive oil, and serve.

Monday, April 13, 2009

Starch on starch, and some musings on pesto

Last week my friends Patrick and Willy paid me a visit. Patrick supplied the tonic, and Willy contributed the gin (and ice cream sandwiches). That meant that the task of feeding us dinner fell to me. I considered a number of factors while deciding what to cook. The first was Patrick's vegetarianism. Easy enough. Secondly, I would be getting home from work at around 7 p.m. and therefore wanted to make something that would both cook quickly and also require little effort on my part. Lastly, I was low on cash but still wanted to fill my friends' bellies. You might already know which food fit the bill on all three accounts: say it with me now, pasta. Predictable enough, right? But to stretch that pasta even further (and because I had some lying around that I needed to use up), I decided to mix in another cheap and filling staple: potatoes. Pasta and potatoes?!, you might be thinking, that's a lot of starch! Indeed it is, my friends, and the combination happens to be delicious. Especially when you stir in some sweet, snappy green beans for color and crunch. Particularly when you liberally coat the whole mélange with a thick slick of nutty, herbaceous, unctuous pesto.

Like sundried tomatoes, chipotle peppers and, most recently, bacon, pesto has suffered from overexposure. Emblematic of the "California cuisine" craze that swept the nation beginning in the 1980s--thanks in large part to a man named Wolfgang Puck--the classic Italian formula soon seemed to show up in everything from scrambled eggs from the diner to Domino's pizza. Having reached its zenith in the 90s, this trend has subsided a bit, whether breathmint manufacturers like it or not. And though our palates may have experienced pesto fatigue for a while there, it's easy to understand why pesto achieved such notoriety. It's in the taste: that bright combination of spicy garlic, lemony fresh basil, earthy pine nuts and fruity olive oil is hard to argue with. Another thing that pesto has going for it is its ease of preparation. If you have a food processor or blender, you're there in about 60 seconds; armed with a mortar and pestle, it's a matter of mere minutes. Lastly, pesto's versatility is nearly unparalleled in the world of condiments: it's as at home slathered on a sandwich as it is dolloped on a piece of simply broiled fish. It's for these reasons that I'm still a fan of pesto in spite of its ubiquity.

An easy way to keep your pestomaking exciting and new is to swap out two of its essential components--the basil and the pine nuts--for different, but no less delicious, ingredients. In basil's stead, you might try using a fresh herb such as parsley or cilantro or even a peppery green like arugula, and in place of the pine nuts, try grinding in some walnuts or almonds. That's what I did when I prepared my starch-on-starch pasta dinner for my friends. I had plenty of basil on hand, but no pine nuts, and so to save myself a trip the store (and a bit of cash--pine nuts are expensive) I used walnuts instead. The resulting pesto was a little earthier-tasting and somewhat more bitter than traditional pesto, and provided a nice foil to the bland comfort of pasta and potatoes:


Basil-Walnut Pesto

Makes about 1 cup

1. Thoroughly rinse and dry one large bunch of basil.
2. Pluck basil leaves, discarding stems, and add to the bowl of a food processor. Add 2 -3 garlic cloves, 1/2 cup chopped walnuts (not toasted), and salt and pepper to taste. Pulse mixture until nuts are finely chopped and a paste begins to form. Scrape down bowl and add 1/4 to 1/2 cup extra virgin olive oil and puree until oil is incorporated.
3. Scrape mixture into a bowl and add 1/2 cup finely grated Parmesan (or similar cheese). Stir to combine. Taste pesto and adjust salt and pepper as necessary.

Spaghetti with Green Beans, Potatoes and Pesto
Serves 4

1. Bring a large pot of salted water to a boil. Add 1 lb. (about 4 - 5) small new potatoes and cook until tender, about 8 - 10 minutes. Remove to cool.
2. Add 3/4 lb. trimmed and halved green beans to the water and cook until cooked through but still crisp and bright green, about 3 minutes. With a slotted spoon, remove the beans to a large bowl of icewater to stop their cooking. Drain beans and set aside.
3. Cook 3/4 lb. spaghetti in the water until al dente, about 10 - 12 minutes. Towards the end of the cooking process, reserve about 1 cup pasta water. Drain pasta and return it to the pot.
4. Cut potatoes into bite-size pieces and add them to the pasta along with the green beans. Add about 1/2 to 3/4 cup basil pesto to the pot, along with a small amount of the pasta cooking water, and toss gently until the pasta, potatoes and beans are evenly coated with pesto. If pesto remains too thick, add more pasta water, a few tablespoons at a time, until it has thinned. Taste pasta and add more salt and pepper as needed.
5. Divide pasta between bowls, garnishing with extra grated cheese and freshly ground black pepper, if desired.

Wednesday, June 10, 2009

More adventures in vegetarianism with Patrick

A week or two (or three...I'm a little behind on my blogging) ago, Patrick joined me on my deck for another one of our dinner installments. Sadly our dear friend Willy couldn't join us this time, but not to worry, Willy, it's not like we mocked you in your absence or anything, not even a little, I swear it. Ahem.

It's grilling season, or at least it was a couple of weeks ago, before the heavy clouds settled on top of New York and decided to stay put for a while. And yet again, I wanted to think of something creatively vegetarian to make for Patrick and myself. First I envisioned a big platter of grilled vegetables like eggplant, zucchini and bell peppers, drizzled with tahini, sprinkled with pine nuts and some chopped fresh herbs. That would have been delicious, I'm sure, but I decided I wasn't really in the mood for tahini. The idea of grilled vegetables resonated, though, and my thoughts turned to grilled portobello mushroom caps. Kind of a cliched choice for a vegetarian dish, though, right? I felt the same way. So I tried to mix things up a little. My solution? Serve the portabello caps on toasted wheat buns, spread thickly with a creamy, herby white bean spread flavored with lemon and olive oil, and top that off with crisp, peppery arugula:


In order to take further advantage of the hot grill and of my new herb garden, I also served up a tomato salad topped with grilled corn and fresh basil:


As far as I could tell, Patrick approved:


Portobello Mushroom Burgers with Herbed White Bean Spread and Arugula
Serves 4

1. Light a gas or charcoal grill, or heat a cast iron grill pan over medium heat.
2. Wipe 4 portobello caps clean. Place them in a shallow baking dish or rimmed plate and drizzle them with about 3 tbsp. olive oil and 2 tbsp. balsamic vinegar, turning the mushrooms to coat them evenly. Sprinkle both sides of the mushrooms with salt and black pepper.
3. Grill the mushroom caps until they are tender and have lost a fair amount of their moisture, about 4 minutes per side. Set them aside.
4. Toast 4 whole wheat hamburger buns on the grill or grill pan. Place one mushroom cap on each bun, then top each with a generous spoonful of Herbed White Bean Spread (recipe follows). Spread to distribute.
5. Finally, top each burger with a handful of cleaned arugula or other bitter greens.


Herbed White Bean Spread

Makes about 1 1/2 cups

1. Place one small (15.5 oz) can of white (cannellini) beans, rinsed and drained, in the bowl of a food processor or small electric chopper. Add 1 - 2 peeled garlic cloves, about 2 tbsp. fresh oregano leaves, 2 tbsp. fresh thyme leaves, the juice of 1 lemon, and plenty of salt and pepper. Pulse to combine.
2. Add about 2 tbsp. of extra virgin olive oil to the mixture. Pulse to combine. The spread is done when it is nearly smooth but still has a bit of texture to it.


Summer Tomato Salad with Grilled Corn and Fresh Basil
Serves 4

1. Using the reddest, ripest tomatoes you can find, slice about 4 large or 6 medium-sized tomatoes about 1/2" thick. Lay the slices on a large plate or platter.
2. Prepare the corn: lay two ears of corn, still in their husks, on a medium-low grill. Cook, covered, until tender and slightly charred, turning if necessary, about 14 - 16 minutes. Remove corn from the grill, strip off the husks, and, using a sharp knife, shave the kernels off the cobs.
3. Sprinkle the grilled corn kernels evenly over the tomatoes. Dress the salad with about 4 tbsp. extra virgin olive oil, 3 tbsp. balsamic vinegar, and plenty of salt and pepper.
4. Finally, shred or tear a good large handful of fresh basil and sprinkle it over the salad before serving.

Sunday, July 27, 2008

Cheap Eats Hall of Fame: Punjabi

It isn't all that easy to find truly cheap eats in New York. Sure, you might be able to grab a quick snack for a few bucks, but it's rare to happen upon a place where you can get an entire meal for that price. And in this economy? Well, as we New Yorkers (supposedly) like to say, Fuhgeddaboutit! I mean, even the famously dirt-cheap square meal at Gray's Papaya, the Recession Special--currently priced at $3.50--is about to jump in cost for the second time since 2006.

So imagine my delight when my friend Willy recently introduced me to one of his favorite bargain dining spots, Punjabi. Punjabi is an unassuming--even scruffy--little storefront located right off of East Houston Street in the East Village. It's an Indian/Pakistani takeout joint that NYC cabbies frequent: when I was there last week the line of taxis out front extended down the block. Well, take it from the cabbies, because not only is the food here crazy inexpensive, but it's delicious and satisfying, too. Here it is, Punjabi in all its dingy glory:


And there's not much more to the inside, either: just a narrow counter running alongside the right side of the restaurant, where, if you're lucky, there might be a few stools for you to sit on, and, on the left, the glass case that displays the day's offerings. Punjabi has a rotating menu of six vegetarian dishes labeled only with a number; to order you say, for example, "A small with rice and #3 and #6." A generous portion of rice then gets scooped into a small styrofoam bowl, topped with your selections, and nuked in one of the four microwaves that perch atop the display case. How much? $3 for a small--which, for me, is plenty of food, and I have a big appetite--or you could cough up two more dollars for a large, which allows you three vegetable offerings. Here's what I got when I was in recently: a small with spinach and a stew of peas, carrots and cauliflower:


I probably should have thought, before selecting that spinach, that it would photograph like something that comes out of a baby's diaper. But you know what? There was really no other choice. I've gotten that dish each time I've been to Punjabi, and it's excellent: meltingly creamy, with soft, sweet onions cooked into the mix, and a bracing seasoning of turmeric, fresh garlic, and lots of fresh ginger. Yum. My other selection tasted great, too. I can never resist anything with cauliflower in it, and Indian food makes particularly tasty use of it. The vegetables in the stew were well-cooked but still had some bite to them, and came bathed in a fragrant sauce that complemented the perfumed basmati rice. So the next time you find yourself with an empty stomach and $3 burning a hole in your pocket, I suggest you follow the taxicabs and head on over to Punjabi.

Punjabi
114 East 1st Street (between 1st Ave. and Ave. A)
(212) 533-9048

Sunday, April 22, 2012

A mutt of a dish

Last week my friends Willy and Clemmy came over for an impromptu weeknight dinner. In deciding what to make, I established two things: one, that I hadn't cooked anything Mexican in a while, so that'd be the direction I'd take, and two, that I wanted to spend as little money as possible. A look in the fridge revealed a dire lack of produce, but in the freezer I found a stack of corn tortillas, as well as a small container of chipotles en adobo. Those items would help things along. As I've mentioned many a time on the blog, my eating habits have changed a bit over the past few years, as I've become more interested in local, organic food: notably, I've been eating a lot less meat, and when it comes to cooking at home, I almost always prepare vegetarian dishes. When you have access to beautiful, fresh produce, it's easy to make a meal that's so flavorful that it simply doesn't need meat. Cooking almost exclusively with vegetables also keeps those grocery bills down, something that—as a perpetual unpaid intern living in New York City—is always at the forefront of my mind. So once I settled on Mexican with tortillas and chipotles, I started to think of what kind of meatless dish I could make, and that's when it came to me: chilaquiles. I hadn't eaten them in a long, long time, so they sounded good, and though they wouldn't be super quick to prepare, it would be a relatively easy process.

I'm no expert on what comprises traditional chilaquiles, but the versions I've eaten in New York tend to be made with crisp-fried corn tortillas or tortilla chips, blanketed with green or red salsa, layered with shredded meat, and finished off with a generous amount of melted cheese. Sometimes the chips remain crisp; sometimes they're soggy. I like both ways. What I came up with was a riff on these dishes, by no means the same in preparation but pretty similar in terms of flavor. In the interest of cutting down on prep time as well as keeping the end result a lot healthier, I decided not to fry my tortillas, but rather to crisp them up in a warm oven, then crumble them into manageable pieces before layering them in a baking dish with some homemade red salsa, shredded Jack cheese, and a mix of vegetables: a sort of Mexican lasagna, if you will.


First things first: the salsa roja. I made a simple one by roasting together some tomatoes, jalapeños, and onions, then blending them up in the food processor, along with the liquid they lot off in cooking as well as some chipotles en adobo and red wine vinegar.


I settled on a combination of sweet potatoes, black beans and green onions as my filling. I roasted up the sweet potatoes in the oven as I cooked the tomato mixture; the beans were just rinsed canned beans (soaked and cooked dried beans would be even better, if you have those on hand). To build the "lasagna," I started with a layer of salsa in the bottom of a glass baking dish, then a layer of the broken-up tortillas, then a scattering of vegetables:


That got covered in some more salsa, then a generous amount of shredded cheese. Then I started over again: tortillas, salsa, veggies, and cheese, until I ran out of ingredients: I got 3 layers in there, with the top one being just tortillas and cheese. That all got baked in the oven, wrapped in a protective layer of foil, until things were nice and hot and bubbly, when I removed the foil to brown the cheese to a burnished finish:


After a brief rest to allow everything to settle, I cut that bad boy up into generous pieces. My friends and I ate them topped with sour cream, sliced avocados, chopped cilantro, and a squeeze of fresh lime:


Mexican Chilaquiles with Sweet Potatoes and Black Beans
Serves 6 - 8

2 large or 3 medium tomatoes, cut into large pieces
1 large onion, cut into quarters
2 jalapeños, stem removed, cut in half lengthwise
About 2 tbsp. vegetable oil, divided
Salt
Pepper
1 tbsp. chipotles en adobo (both peppers and sauce)
1 tbsp. red wine vinegar
1 package corn tortillas
1 large or two medium sweet potatoes, rinsed and cut into a small dice
2 15.5 oz cans black beans, rinsed and drained
3 - 4 green onions, white and green parts, thinly sliced
8 oz. Monterey Jack cheese, shredded (about 2 cups)
1 avocado, pitted and sliced
1 lime, cut into wedges
Sour cream, for serving
Chopped cilantro, for serving

Preparation:

1. Preheat the oven to 400°.

2. Combine tomato, onion, and jalapeño in a large bowl. Drizzle with 1 tbsp. vegetable oil and sprinkle with salt and pepper. Toss to coat, then turn into an oven-safe dish. Roast for about 30 minutes, or until tomatoes are soft and juicy and onions and peppers begin to brown.

3. Use the same large bowl to toss the sweet potatoes with 1 tbsp. oil and salt and pepper. Turn potatoes onto a baking sheet and roast for about 20 minutes, or until soft and well-browned. Remove all vegetables from oven and lower heat to 250°.

4. In the bowl of a blender or food processor, blend roasted vegetables and their liquid until smooth. Add chipotle, vinegar and salt and blend again. Check for seasoning, adding more vinegar or salt as needed. Set salsa aside.

5. Spread tortillas out in a single layer over several large baking sheets (you'll need about 15 small tortillas total). Bake in oven until crisp and slightly browned, about 20 minutes. Remove from oven and let cool. Increase oven temperature to 350°.

6. Assemble the chilaquiles: in the bottom of a large glass lasagna pan, spread a thin layer of salsa. Break 5 tortillas into large pieces and distribute over salsa. Sprinkle half the sweet potatoes, half the black beans and half the green onions over tortillas. Pour half of remaining salsa over vegetables, then sprinkle with one third of the Jack cheese. Repeat with 5 more tortillas, rest of vegetables, rest of salsa, and one more third of cheese. Finish with a top layer of 5 more tortillas and the rest of the shredded cheese.

7. Spray a large rectangular piece of aluminum foil with nonstick cooking spread and cover baking dish tightly. Place dish in oven and bake until chilaquiles are hot and the cheese has melted, about 25 minutes. Remove foil and bake until top layer of cheese is nicely browned, about 15 more minutes. Remove from oven and let rest about 15 minutes before cutting into 6 - 8 pieces. Serve with sour cream, avocado, cilantro and lime.

Sunday, January 11, 2009

Happy birthday to me

It was my birthday on Friday and to celebrate I did what most any foodie would do: cooked a meal for about 15 people. Sounds stressful, right? Well, it wasn't. When planning my party I tried to come up with some food options that would be cheap, easy and plentiful enough to feed a crowd. Suddenly I hit upon a winning idea: slow-roasted pork shoulder, also known as pork butt (how appealing). Since I've moved to my neighborhood of south Park Slope, I've been intending to take better advantage of the many Latin American ingredients available in the supermarkets around here: things like fresh cactus, a variety of fresh and dried chiles, and, most prominently, pork--in all its shapes, sizes and cuts. I'm talking trotters, pork kidneys, pork ribs, and, yes, pork shoulder. Because I don't tend to follow recipes, though, I also tend not to purchase ingredients that are unfamiliar to me, because I don't have an instinct for how to cook them. But I decided that my birthday would be the perfect occasion to break this bad habit, so I went whole-hog (ha, ha), buying a 10-pound pork shoulder and preparing it in the Puerto Rican style called pernil.

Pork shoulder is a tough cut of meat that becomes tender and succulent after many hours of low-temperature cooking, like braising on the stovetop or roasting in the oven. Because it's not a very "desirable" piece of meat, it's also very inexpensive--I got it at my local Met supermarket for $1/lb. A dollar a pound! Do the math and you'll see that that means that I fed more than 15 people for about $10. Not bad.

To learn how to prepare the pernil I looked at a number of recipes online and eventually settled on Mark Bittman's version. A New York Jew is perhaps not the most authentic source for a Puerto Rican recipe, but his method was the most simple and, after all, I didn't want to be stressed on my own birthday. The basic preparation is as follows. A day before you intend to cook the pernil, score its layer of fat and rub the whole thing with a strongly-flavored marinade made of chopped onions, garlic, cumin and chile powder. Wrap the meat in plastic wrap and set it in the fridge. When you wake up the next morning, turn your oven to 300° and put the pork in. Then you can basically forget all about it. Other than turning the pan every hour or so and making sure that the fat isn't burning--and covering the roast with tin foil if it is--you don't have to do anything but sit back and enjoy the intoxicatingly porky aromas that will fill your apartment, and, odds are, your entire apartment building. Around dinner time, remove the pork from the oven and let it rest for about 15 minutes. Then you can simply shred the meat into long, tender strands with a fork--it falls apart completely.

Pernil would be excellent served alongside rice and beans and a salad (to cut the richness of the fatty meat), but to keep things simple I chose to serve mine with two easy salsas: a basic tomato pico de gallo and a corn and black bean salsa (special thanks to Willy for his cilantro-chopping skills). With some warm corn tortillas on the side, it was a filling, satisfying meal that was perfect for the occasion.


Pernil
Adapted from nytimes.com
Makes at least 6 servings

Ingredients:

1 pork shoulder, 4 to 7 pounds (or use fresh ham)
4 or more cloves garlic, peeled
1 large onion, quartered 2 tablespoons fresh oregano leaves or 1 tablespoon dried oregano
1 tablespoon ground cumin
1 teaspoon ancho or other mild chili powder
1 tablespoon salt
2 teaspoons freshly ground black pepper
Olive oil as needed
1 tablespoon wine or cider vinegar Lime wedges for serving

Preparation:

1. Score meat’s skin with a sharp knife, making a cross-hatch pattern. Pulse garlic, onion, oregano, cumin, chili, salt and pepper together in a food processor, adding oil in a drizzle and scraping down sides as necessary, until mixture is pasty. (Alternatively, mash ingredients in a mortar and pestle.) Blend in the vinegar.

2. Rub this mixture well into pork, getting it into every nook and cranny. Cover with plastic wrap and place in fridge. Let marinate for 12-24 hours.

3. Heat oven to 300 degrees. Remove plastic wrap from pork and place in a roasting pan, filling the bottom with about a half inch of water. Roast pork for several hours (a 4-pound shoulder may be done in 3 hours), turning every hour or so and adding more water as necessary, until meat is very tender. Finish roasting with the skin side up until crisp, raising heat at end of cooking if necessary.

4. Let meat rest for 10 to 15 minutes before cutting it up; meat should be so tender that cutting it into uniform slices is almost impossible; rather, whack it up into chunks. Serve with lime.

Pico de Gallo
Makes about 3 cups

Finely dice 6 ripe plum tomatoes and place in a large bowl. Add one large white onion, finely diced, 3 cloves of garlic, minced, one bunch of finely chopped cilantro, 1-2 jalapeños, minced, the juice of 2-3 limes, and plenty of salt. Mix well and taste to adjust seasoning.

Corn and Black Bean Salsa
Makes about 4 cups

Open a 15.5 oz. can of black beans; rinse them of their liquid and drain well. Place in a large bowl. Add half a 10 oz. bag of thawed frozen corn, half a large white onion, finely diced, one bunch of finely chopped cilantro, the juice of 2-3 limes, and plenty of salt. Mix well and taste to adjust seasoning.

Monday, April 9, 2012

All of the quiche, none of the crust

Several weeks ago, my friends Willy and Jessica came over early(ish) on a Sunday morning to help me tackle a DIY project I'd been hoping to try for a while: making homemade almond milk (stay tuned for that post!). Gracious hostess that I am, I decided to feed my buddies something appropriately brunch-y as we readied ourselves to juice nuts. Now, you might notice a distinct lack of brunch recipes here on the blog, as, in general, I'm not a big fan of said meal: certainly not in restaurants, where the food tends to be overpriced and phoned in by some line cook while the chef takes the morning off, and not usually at home, either: my motor skills in the morning are up to the task of pouring a bowl of cereal or sliding some bread into the toaster oven, but nothing much more complicated than that, and especially not on a weekend morning, when I might have stayed out late the night before.

So I spent some time thinking about what people eat for brunch, and then I remembered: quiche! Now, quiche is not something I make all that often, but it's easy and tasty, so I figured it would fit the bill. Not wanting to fuss around with a crust, I decided to just do without. In this I drew some inspiration from my friend Patricia, who has lived in France for so long now that she's basically French, and therefore prepares quiche on a regular basis (not a myth—French people actually do make quiche all the time). Patricia makes delicious quiches, and they never have a crust. One thing they usually do have, though, is fish, in the form of tuna or salmon. Since I had a beautiful, wild-caught fillet of salmon in my freezer, I decided to thaw it out, poach it, and flake it into my quiche, along with some melted leeks:


To keep the filling moist and flavorful, I folded in some additional ingredients: chopped fresh dill, créme fraiche and Dijon mustard, then spread the mixture into the bottom of a greased pie plate:


Taking my cue from from France yet again, I prepared the quiche batter with a lot of dairy and not a lot of eggs. My usual instinct when making quiche would be to use many eggs, adding a bit of milk to stretch them, but I've noticed that French people always make quiche with a ton of milk, or créme fraiche, or both, and only a few eggs, and their quiches always come out phenomenally: exceptionally moist and tender, more like a custard than an omelet. And when you think about it, this approach makes sense: quiche, if not a poverty food, is certainly a classic use-up-the-leftovers dish: stick 'em in a pan, bind 'em together, and bake 'em. If the idea is to not draw too heavily upon everything else in the fridge, keeping the meal frugal and quick to prepare, then the French recipe is logical. So I did as the French do, and I have to say that although my quiche wasn't as exceptional as Patricia's (or my other French friend, Mathilde's) egg pie, it was still pretty darn good:


Salmon, Leek and Dill (Crustless) Quiche
Makes one quiche

Ingredients:

1 salmon fillet, about 4 oz.
Water
Fresh dill, with about 3 tbsp. finely chopped
1 large or 2 medium leeks, well cleaned of all grit, white and light green parts finely sliced into half moons and dark green tops set aside
Black peppercorns
3 tbsp. butter
1/2 c. plus 2 tbsp. créme fraiche or sour cream, divided
1 tbsp. Dijon mustard
Cooking spray or additional butter
3 eggs, lightly beaten
1/2 c. milk, preferably whole
Salt
Pepper

Preparation:

1. Preheat oven to 375°.

2. Poach the salmon: in a small saucepan, combine the salmon, some torn fresh dill, some torn dark green leek tops, a few black peppercorns, and about 1/2 tsp. salt, along with enough water to cover. Bring to a boil, then drop to a simmer. Simmer for six minutes, then turn off heat; four minutes later, remove fish and let cool. When cool, flake fish into small pieces and place in a large bowl.

3. Prepare the filling: in a large, heavy-bottomed skillet, melt butter over medium heat. Add sliced leeks and cook, stirring occasionally, until leeks are very soft and lightly browned, about 15 minutes. Add leeks to flaked salmon; add 2 tbsp. créme fraiche, the Dijon mustard and chopped dill, as well as salt and pepper to taste. Stir gently to combine, then spread evenly across the bottom a a glass pie dish, greased with spray or additional butter.

4. Prepare batter: combine eggs with remaining créme fraiche and all the milk, plus a generous amount of salt and pepper. Pour over filling and place in oven, baking quiche until it is puffed and browned on top, about 45 minutes.