Showing posts with label vegetarian. Show all posts

Wednesday, May 9, 2012

Lunch, by way of India

Cauliflower is one of my very favorite vegetables, but somehow there's been a severe lack of cauliflower coverage on the site—in fact, not since my very first blog post over four years ago have I talked about this crucifer. Well, it's high time that's corrected.

My favorite way to prepare cauliflower is to roast it at a high temperature. If you're used to soggy, bland cauliflower, likely served steamed perhaps at some point in your childhood, then you wouldn't even recognize it roasted: it becomes golden, crisp-tender and incredibly rich in flavor, much like a roasted potato.

I usually go one of two routes when roasting my cauliflower: the Mediterranean, almost Provençal one, in which the cooked vegetable is tossed with capers and parsley and topped with toasted breadcrumbs; or the Indian one, in which the cauliflower is accented with warm, aromatic spices like cumin, coriander and mustard seed.


Cauliflower is an integral part of the cuisine in India, a country where over 30% of population is vegetarian. Aloo gobi, or potatoes and cauliflower in a curried stew, is probably the best-known such dish in this country, but other popular cauliflower dishes include cauliflower fritters and cauliflower and mung bean stew.


It's for that reason that I often turn to India when roasting this vegetable: simply tossing it in a mixture of dried spices, and sometimes throwing in some spicy chiles, before letting it get browned and toasty in a hot oven. That's what I did today; topped with yogurt and sprinkled with fresh cilantro, it made a tasty lunch.


Indian-Spiced Roasted Cauliflower
Serves 3 - 4 as a side dish

Ingredients:

1 head of cauliflower, cut into small florets
2 jalapeños or similar green chiles, seeds intact, halved lengthwise and sliced into thin half moons
2 tbsp. canola or vegetable oil
1 tsp. ground turmeric
1 tsp. whole cumin seeds
1 tsp. whole coriander seeds
Salt to taste, about 1 1/2 tsp.
Plain yogurt, for serving (optional)
Chopped fresh cilantro, for serving (optional)

Preparation:

1. Preheat the oven to 400°.

2. Combine all ingredients in large bowl and toss, coating all the cauliflower evenly with oil and spices. Turn out onto a large sheet tray and roast until cauliflower is tender and well-browned, about 20 - 25 minutes. Serve as is or topped with plain yogurt and chopped cilantro.

Sunday, April 22, 2012

A mutt of a dish

Last week my friends Willy and Clemmy came over for an impromptu weeknight dinner. In deciding what to make, I established two things: one, that I hadn't cooked anything Mexican in a while, so that'd be the direction I'd take, and two, that I wanted to spend as little money as possible. A look in the fridge revealed a dire lack of produce, but in the freezer I found a stack of corn tortillas, as well as a small container of chipotles en adobo. Those items would help things along. As I've mentioned many a time on the blog, my eating habits have changed a bit over the past few years, as I've become more interested in local, organic food: notably, I've been eating a lot less meat, and when it comes to cooking at home, I almost always prepare vegetarian dishes. When you have access to beautiful, fresh produce, it's easy to make a meal that's so flavorful that it simply doesn't need meat. Cooking almost exclusively with vegetables also keeps those grocery bills down, something that—as a perpetual unpaid intern living in New York City—is always at the forefront of my mind. So once I settled on Mexican with tortillas and chipotles, I started to think of what kind of meatless dish I could make, and that's when it came to me: chilaquiles. I hadn't eaten them in a long, long time, so they sounded good, and though they wouldn't be super quick to prepare, it would be a relatively easy process.

I'm no expert on what comprises traditional chilaquiles, but the versions I've eaten in New York tend to be made with crisp-fried corn tortillas or tortilla chips, blanketed with green or red salsa, layered with shredded meat, and finished off with a generous amount of melted cheese. Sometimes the chips remain crisp; sometimes they're soggy. I like both ways. What I came up with was a riff on these dishes, by no means the same in preparation but pretty similar in terms of flavor. In the interest of cutting down on prep time as well as keeping the end result a lot healthier, I decided not to fry my tortillas, but rather to crisp them up in a warm oven, then crumble them into manageable pieces before layering them in a baking dish with some homemade red salsa, shredded Jack cheese, and a mix of vegetables: a sort of Mexican lasagna, if you will.


First things first: the salsa roja. I made a simple one by roasting together some tomatoes, jalapeños, and onions, then blending them up in the food processor, along with the liquid they lot off in cooking as well as some chipotles en adobo and red wine vinegar.


I settled on a combination of sweet potatoes, black beans and green onions as my filling. I roasted up the sweet potatoes in the oven as I cooked the tomato mixture; the beans were just rinsed canned beans (soaked and cooked dried beans would be even better, if you have those on hand). To build the "lasagna," I started with a layer of salsa in the bottom of a glass baking dish, then a layer of the broken-up tortillas, then a scattering of vegetables:


That got covered in some more salsa, then a generous amount of shredded cheese. Then I started over again: tortillas, salsa, veggies, and cheese, until I ran out of ingredients: I got 3 layers in there, with the top one being just tortillas and cheese. That all got baked in the oven, wrapped in a protective layer of foil, until things were nice and hot and bubbly, when I removed the foil to brown the cheese to a burnished finish:


After a brief rest to allow everything to settle, I cut that bad boy up into generous pieces. My friends and I ate them topped with sour cream, sliced avocados, chopped cilantro, and a squeeze of fresh lime:


Mexican Chilaquiles with Sweet Potatoes and Black Beans
Serves 6 - 8

2 large or 3 medium tomatoes, cut into large pieces
1 large onion, cut into quarters
2 jalapeños, stem removed, cut in half lengthwise
About 2 tbsp. vegetable oil, divided
Salt
Pepper
1 tbsp. chipotles en adobo (both peppers and sauce)
1 tbsp. red wine vinegar
1 package corn tortillas
1 large or two medium sweet potatoes, rinsed and cut into a small dice
2 15.5 oz cans black beans, rinsed and drained
3 - 4 green onions, white and green parts, thinly sliced
8 oz. Monterey Jack cheese, shredded (about 2 cups)
1 avocado, pitted and sliced
1 lime, cut into wedges
Sour cream, for serving
Chopped cilantro, for serving

Preparation:

1. Preheat the oven to 400°.

2. Combine tomato, onion, and jalapeño in a large bowl. Drizzle with 1 tbsp. vegetable oil and sprinkle with salt and pepper. Toss to coat, then turn into an oven-safe dish. Roast for about 30 minutes, or until tomatoes are soft and juicy and onions and peppers begin to brown.

3. Use the same large bowl to toss the sweet potatoes with 1 tbsp. oil and salt and pepper. Turn potatoes onto a baking sheet and roast for about 20 minutes, or until soft and well-browned. Remove all vegetables from oven and lower heat to 250°.

4. In the bowl of a blender or food processor, blend roasted vegetables and their liquid until smooth. Add chipotle, vinegar and salt and blend again. Check for seasoning, adding more vinegar or salt as needed. Set salsa aside.

5. Spread tortillas out in a single layer over several large baking sheets (you'll need about 15 small tortillas total). Bake in oven until crisp and slightly browned, about 20 minutes. Remove from oven and let cool. Increase oven temperature to 350°.

6. Assemble the chilaquiles: in the bottom of a large glass lasagna pan, spread a thin layer of salsa. Break 5 tortillas into large pieces and distribute over salsa. Sprinkle half the sweet potatoes, half the black beans and half the green onions over tortillas. Pour half of remaining salsa over vegetables, then sprinkle with one third of the Jack cheese. Repeat with 5 more tortillas, rest of vegetables, rest of salsa, and one more third of cheese. Finish with a top layer of 5 more tortillas and the rest of the shredded cheese.

7. Spray a large rectangular piece of aluminum foil with nonstick cooking spread and cover baking dish tightly. Place dish in oven and bake until chilaquiles are hot and the cheese has melted, about 25 minutes. Remove foil and bake until top layer of cheese is nicely browned, about 15 more minutes. Remove from oven and let rest about 15 minutes before cutting into 6 - 8 pieces. Serve with sour cream, avocado, cilantro and lime.

Monday, April 9, 2012

All of the quiche, none of the crust

Several weeks ago, my friends Willy and Jessica came over early(ish) on a Sunday morning to help me tackle a DIY project I'd been hoping to try for a while: making homemade almond milk (stay tuned for that post!). Gracious hostess that I am, I decided to feed my buddies something appropriately brunch-y as we readied ourselves to juice nuts. Now, you might notice a distinct lack of brunch recipes here on the blog, as, in general, I'm not a big fan of said meal: certainly not in restaurants, where the food tends to be overpriced and phoned in by some line cook while the chef takes the morning off, and not usually at home, either: my motor skills in the morning are up to the task of pouring a bowl of cereal or sliding some bread into the toaster oven, but nothing much more complicated than that, and especially not on a weekend morning, when I might have stayed out late the night before.

So I spent some time thinking about what people eat for brunch, and then I remembered: quiche! Now, quiche is not something I make all that often, but it's easy and tasty, so I figured it would fit the bill. Not wanting to fuss around with a crust, I decided to just do without. In this I drew some inspiration from my friend Patricia, who has lived in France for so long now that she's basically French, and therefore prepares quiche on a regular basis (not a myth—French people actually do make quiche all the time). Patricia makes delicious quiches, and they never have a crust. One thing they usually do have, though, is fish, in the form of tuna or salmon. Since I had a beautiful, wild-caught fillet of salmon in my freezer, I decided to thaw it out, poach it, and flake it into my quiche, along with some melted leeks:


To keep the filling moist and flavorful, I folded in some additional ingredients: chopped fresh dill, créme fraiche and Dijon mustard, then spread the mixture into the bottom of a greased pie plate:


Taking my cue from from France yet again, I prepared the quiche batter with a lot of dairy and not a lot of eggs. My usual instinct when making quiche would be to use many eggs, adding a bit of milk to stretch them, but I've noticed that French people always make quiche with a ton of milk, or créme fraiche, or both, and only a few eggs, and their quiches always come out phenomenally: exceptionally moist and tender, more like a custard than an omelet. And when you think about it, this approach makes sense: quiche, if not a poverty food, is certainly a classic use-up-the-leftovers dish: stick 'em in a pan, bind 'em together, and bake 'em. If the idea is to not draw too heavily upon everything else in the fridge, keeping the meal frugal and quick to prepare, then the French recipe is logical. So I did as the French do, and I have to say that although my quiche wasn't as exceptional as Patricia's (or my other French friend, Mathilde's) egg pie, it was still pretty darn good:


Salmon, Leek and Dill (Crustless) Quiche
Makes one quiche

Ingredients:

1 salmon fillet, about 4 oz.
Water
Fresh dill, with about 3 tbsp. finely chopped
1 large or 2 medium leeks, well cleaned of all grit, white and light green parts finely sliced into half moons and dark green tops set aside
Black peppercorns
3 tbsp. butter
1/2 c. plus 2 tbsp. créme fraiche or sour cream, divided
1 tbsp. Dijon mustard
Cooking spray or additional butter
3 eggs, lightly beaten
1/2 c. milk, preferably whole
Salt
Pepper

Preparation:

1. Preheat oven to 375°.

2. Poach the salmon: in a small saucepan, combine the salmon, some torn fresh dill, some torn dark green leek tops, a few black peppercorns, and about 1/2 tsp. salt, along with enough water to cover. Bring to a boil, then drop to a simmer. Simmer for six minutes, then turn off heat; four minutes later, remove fish and let cool. When cool, flake fish into small pieces and place in a large bowl.

3. Prepare the filling: in a large, heavy-bottomed skillet, melt butter over medium heat. Add sliced leeks and cook, stirring occasionally, until leeks are very soft and lightly browned, about 15 minutes. Add leeks to flaked salmon; add 2 tbsp. créme fraiche, the Dijon mustard and chopped dill, as well as salt and pepper to taste. Stir gently to combine, then spread evenly across the bottom a a glass pie dish, greased with spray or additional butter.

4. Prepare batter: combine eggs with remaining créme fraiche and all the milk, plus a generous amount of salt and pepper. Pour over filling and place in oven, baking quiche until it is puffed and browned on top, about 45 minutes.

Wednesday, March 21, 2012

Kale, the belle of the ball

My relationship with kale started off rocky. I first encountered this lovely leafy green at the dinner table at my parents' house in Brooklyn, circa 1993, and it wasn't exactly a love at first sight type of situation. My mom, an excellent cook far ahead of her time in her utilization of healthy ingredients, particularly whole grains, was fond of serving plain steamed vegetables with nary a shake of salt. Hint: when feeding two young children, this is not a particularly sound method (sorry, Mom!). My brother and I hated the stinky, sulfuric pile of stringy greens so much that we would actually form them into little pills in our mouths and swallow them whole with a swift chug of orange juice, our beverage of choice at that time. It wasn't pleasant for anyone involved, and if my memory serves me correctly, my parents finally relented and ceased forcing us to eat steamed kale.

It seems, though, that my mother was prescient in her kale-eating ways, too. Kale is having its fifteen minutes of fame in the food world right now: it's all over restaurant menus in New York City (even in cocktails), and recipes for kale dishes are being featured prominently on food sites like Serious Eats: here's one recipe roundup and one drinks post featuring kale juice. (I'll note, however, that I haven't seen any recipes for plain steamed kale.)

Unlike my mom, I usually like to slick my green vegetables in a bit of fat, in the form of either oil or butter. It doesn't have to be much, but a little lipid goes a long way in rounding out the sharp edges in flavor that some greens have. Usually, I go the classic Italian route and sauté some garlic and red pepper flakes together, then add the greens and maybe a bit of chicken broth to help them break down. But when I received a bag of beautiful, tender baby kale leaves from my CSA last week, I knew I couldn't do the gorgeous produce the disservice of cooking it. Luckily, at my internship at Serious Eats, I had recently edited Kenji's post on one month of veganism, and had spotted a recipe for a marinated kale salad, something I had heard of but never tried. This was the perfect opportunity.

I started by tossing my greens in a marinade of salt and oil, and let that sit at room temperature for a couple of hours. The salt and oil start to break down the leaves--the salt, by drawing out their moisture, and the oil by cutting through their natural waxy, water-resistant coating. The kale becomes more tender and easier to eat, but because there's no heat involved, they retain a bit of their texture and crunch.


When I was ready to serve the kale, I shook on some red pepper flakes and squeezed half a lemon over everything. Because I was eating with friends, and there wasn't quite enough kale to go around to call it a side dish, I decided to divide it up over little garlic toasts, adding an extra drizzle of oil at the very end. I've come a long way from steamed kale, and I don't think I'm ever going back:


Marinated Kale on Garlic Toasts
Serves 4 - 6 as an appetizer

Ingredients:

1/4 - 1/2 lb. kale, rinsed and cut into ribbons (about 1/4 to 1/2 bunch)
1/2 tsp. salt
2 tbsp. olive oil, plus more for drizzling
Red pepper flakes
1/2 a lemon
Half a loaf of bread, cut into 8 -12 small slices
Garlic clove, peeled

Preparation:

1. At least one but preferably two hours before you want to eat, marinate the kale: toss kale with salt and 2 tbsp. olive and let sit at room temperature.

2. When ready to eat, preheat oven to 350°. Place bread on a baking sheet and drizzle with a small amount of oil. Bake until toasted and crispy, about 8 - 10 minutes. Remove from oven and rub each slice with the garlic clove.

3. Finish the kale salad: squeeze the half lemon over kale and add a shake of red pepper flakes. Stir to combine, then divide kale evenly among toasts. Drizzle with additional olive oil and serve.

Wednesday, February 29, 2012

Chinatown, my love

Starting a couple of years ago after I read Fuchsia Dunlop's excellent food memoir Shark's Fin and Sichuan Pepper, then devoured her two beautiful cookbooks Land of Plenty and the Revolutionary Chinese Cookbook, I quickly became obsessed with Chinese cooking, and it's a trend that's continued--and grown--since then. I think Chinese food gets a bad rap--people say it's greasy, or bland, or makes them sick--and that's because they're thinking of the carelessly thrown together, cornstarch- and MSG-laden takeout on their nearest corner. It's simply not an opinion I understand, because true, artfully prepared Chinese food is so incredibly flavorful, bursting with spicy, salty accents and full of contrasting textures that, to my palate, at least, it's simply one of the best cuisines out there. (I should point out here that there isn't really one "Chinese cuisine"--as you may have heard, China is a big country, and there are many regional styles of food. I happen to be partial to the fiery cuisine of the Sichuan or Szechuan province, but then again I like any kind of well-made Chinese food.)

Although you might imagine them to be exotic or difficult, the Chinese recipes I've tried are actually quite easy. What they rely on is a well-stocked pantry: you need some basics such as different kinds of soy sauce, chile pastes, fermented vegetables, toasted sesame oil, etc., but once you have those items the actual preparations are quite simple. For the past few months I'd sort of fallen out of the habit of cooking Asian, and that was because during my last move, I misplaced my precious stash of special ingredients. When I started my internship at Serious Eats, whose offices are located in Manhattan's Chinatown, it was the perfect occasion to restock my cabinets.


Some staples I picked up recently included (from left): fermented broad bean chile paste; Chianking, or black, vinegar; Shaoxing cooking wine; and potato starch (whose silky texture and un-gloppiness I prefer to cornstarch). Don't you love the packaging? So colorful.


Speaking of great packaging, check out these preserved Szechuan vegetables. Drool and an enthusiastic thumb's-up? Now that's great advertising!

Once I had all my go-to ingredients, I put them to good use making a recipe by one of the Serious Eats editors, Kenji Lopez-Alt. Kenji's no slouch when it comes to perfecting recipes: in addition to years of restaurant experience, he's got a stint as editor at Cook's Illustrated under his belt. Having tasted some of the delicious dishes he's whipped up in our office kitchen, such as bok choy and black bean chow fun and tonkotsu ramen, I knew I could trust his recipe for braised eggplant and tofu in garlic sauce. The best tip I learned from this recipe was to steam the eggplant first: sometimes, eggplant takes a long time to break down and become soft and creamy, and getting it to do so often requires a lot of hot oil. The pre-steam allows the eggplant to soften before it gets incorporated into the stir-fry:


Next, I fried up some aromatics: garlic, ginger, scallions, and the preserved vegetables. This right here is why I love Chinese cooking: look at all the flavor packed in there! It doesn't really matter what you add next--that oil has so much going on, anything cooked in it is going to be good:


The steamed eggplant and some diced firm tofu get fried up in here, then cooked down with a richly flavored sauce made up of soy, vinegar, cooking wine, brown sugar and chile paste. Behold, the finished dish:


Braised Eggplant with Tofu in Garlic Sauce
Adapted slightly from seriouseats.com
Serves 4

*Note: visit your local Asian grocery before making this recipe: many of the ingredients are not available at the supermarket.

Ingredients:

- 4 small or 2 large Japanese/Asian eggplants, rinsed and cut into large chunks
- 3 tsp. Chianking vinegar
- 1/2 c. Shaoxing cooking wine
- 1 tbsp. potato starch
- 4 tbsp. soy sauce
- 2 tbsp. brown sugar
- 1 tbsp. fermented broad bean chile paste
- 1 tbsp. sesame oil
- 2 tbsp. vegetable oil
- 2 cloves of garlic, smashed and peeled, plus 4 more cloves, minced or thinly sliced
- A 1-inch nub ginger, peeled and minced or grated
- 3 scallions, thinly sliced, whites and greens separated
- 2 tbsp. Chinese preserved vegetables, minced
- 1 package firm tofu, excess water squeezed out, cut into medium chunks
- 3 tbsp. chopped cilantro

Preparation:

1. Place eggplant in a large bamboo steamer set over a wok filled with 2 inches of water. Bring to a boil over high heat, reduce to a simmer, cover steamer, and cook until eggplant is completely tender, about 15 minutes. Set aside. (If you don't have a bamboo steamer, you can use a steamer insert in a large pot of water.)
2. Make the sauce: in a bowl, combine vinegar, wine, potato starch, soy, brown sugar, chile paste and sesame. Whisk until completely smooth.
3. Wipe out wok. Add oil and whole garlic cloves and cook over medium heat, turning garlic occasionally, until it is browned and fragrant. Remove garlic and discard.
4. Turn heat to high and add minced garlic and ginger, scallion whites, and preserved vegetables. Cook, stirring, about one minute, then stir sauce to recombine, and add to wok. Add eggplant and tofu and stir gently to combine. Bring to a boil, reduce to a simmer, and cook, stirring occasionally until thick and glossy, about 10 minutes longer. Garnish with scallion greens and cilantro and serve immediately with white rice.

Tuesday, February 21, 2012

David Lebovitz's wild rice salad

As a member of a winter CSA share, there are certain vegetables I've had to welcome, en masse, into my home (and refrigerator) this season: namely, potatoes (sweet and white), carrots, and beets. Though root vegetables store well, I find it's best to dispatch them quickly, if I want to have room in my tiny kitchen for anything else. So after last week's CSA pickup, when I was saddled blessed with several pounds of each, I decided to immediately peel and roast them, which would not only concentrate their flavor but also significantly reduce their bulk. But what to do with them afterwards? I've already eaten a bazillion sweet potato fries this season, already prepared roasted beets tossed with yogurt, lime and scallions, already made a huge batch of carrot soup that lingers on in my freezer. As my cubed and seasoned veggies roasted away in the oven, the debate continued: where would they end up? Luckily, divine providence stepped in when I felt compelled to read one of my favorite blogs, that of master pastry chef David Lebovitz, who usually shares sweet recipes, but occasionally throws in a savory one. Blessedly, that day was one of those days.

Early in his career, David worked in the kitchen at Chez Panisse, so he knows his way around vegetables. The recipes he shares on his site hew closely to my own cooking style: heavy on the produce and whole grains, light on the meat. So it came as no surprise when his Wild Rice Salad with Lemon-Tahini Dressing immediately appealed to me. Not only had I recently purchased a big bag of wild rice at the Co-op, but my roasted vegetables would go perfectly in the dish, plus I had just opened a jar of tahini for a hummus-making endeavor.

Actually, speaking of hummus, what attracted me most to this recipe was how it sort of riffs on that classic Middle Eastern spread. The salad's dressing is made of lemon juice, tahini, olive oil, water and raw garlic: if you were to add some chickpeas, you'd have hummus. I love cooking with raw garlic. Growing up, my dad was allergic, so we almost never utilized the stuff, save for rare occasions when my mother--the cook of the household--felt compelled to make a smaller, separate garlic-free dish for my father, and a larger, garlic-heavy one for her, my brother and me. Think about it: a world of tomato sauces, soups, stews, meatballs, all without the beneficent touch of garlic. Sad, right? These days, I think I still cook with less garlic than most people, and to add raw garlic to something feels downright illicit. So this recipe, with its whole one clove of garlic, minced, was damn near a walk on the wild side for me.

I made a few small changes to the dish, the major one being that to further embrace the hummus theme (and because I still had some left over from the Great Garbanzo Soak of 2012), I added a few handfuls of cooked chickpeas. What results is a lovely salad: the wild rice dense and chewy, the roasted vegetables sweet and earthy, with brightness from the lemon and garlic. Not a bad lunch to eat for six days in a row, as I did:


Wild Rice and Roasted Vegetable Salad with Lemon-Tahini Dressing

Adapted from davidlebovitz.com
Serves 6 - 8 as a side dish

Ingredients:

- 1 c. wild rice, rinsed
- About 6 cups peeled and cubed root vegetables: I used a mix of sweet potatoes, beets, and carrots
- Olive oil
- Salt and pepper to taste
- About a cup cooked chickpeas
- 3 to 4 scallions (white and green parts), finely chopped
- 1/2 c. fresh parsley, chopped
- 1/4 c. tahini
- Juice of 2 lemons
- 3 tbsp. warm water
- 1 clove garlic, minced
- 1 tsp. soy sauce
- 1/4 c. olive oil
- Salt and pepper to taste

Preparation:

1. Preheat the oven to 425°. Toss the vegetables with 2 or 3 tbsp. of oil and plenty of salt and pepper. Spread on a large baking sheet (or 2) and cook until tender, about 40 minutes.
2. In the meantime, add wild rice to a medium pot and cover with lots of water. Add about a teaspoon of salt. Cover and bring to the boil then drop to a simmer and cook until rice is tender, about 40 minutes. Drain.
3. As rice and vegetables cool, make the dressing: in a medium bowl, combine the tahini, lemon juice and water, stirring briskly to smooth out the tahini. Whisk in soy sauce and olive oil, season, and taste.
4. When rice and vegetables are cool, combine in a bowl then stir in the chickpeas, scallions and parsley. Add the dressing and mix well. Note: the tahini dressing dries out in the fridge. If you're not eating all the salad at once, store salad mix and dressing in separate containers in the fridge and combine them before serving.

Monday, February 13, 2012

More fun with chickpeas

My friend Mathilde's birthday was last Friday, and we had a small party to celebrate. As is usual, when we gather at Willy's house, food played a supporting starring role. As a sort of group effort, we all pitched in to make a big pot of tortilla soup with all the fixins, Willy made another ridiculously intricate and delicious layer cake, and I decided to contribute some hummus that I prepared at home earlier in the day. Inspired by my recent success cooking with dried, soaked chickpeas, I decided to go that route with my hummus, in lieu of canned garbanzos. I soaked and cooked some more chickpeas, then drained them, reserving the cooking liquid. I tipped most of the legumes into my food processor, keeping back about a cup of them, and made my standard hummus by adding garlic, tahini, lemon juice, olive oil and some of the cooking liquid. After tasting and adjusting the flavors to my liking, I let the food processor run for a long time, whipping the hummus into a dense, silky purée. The dried chickpeas contribute a better texture and a fuller flavor to the spread.

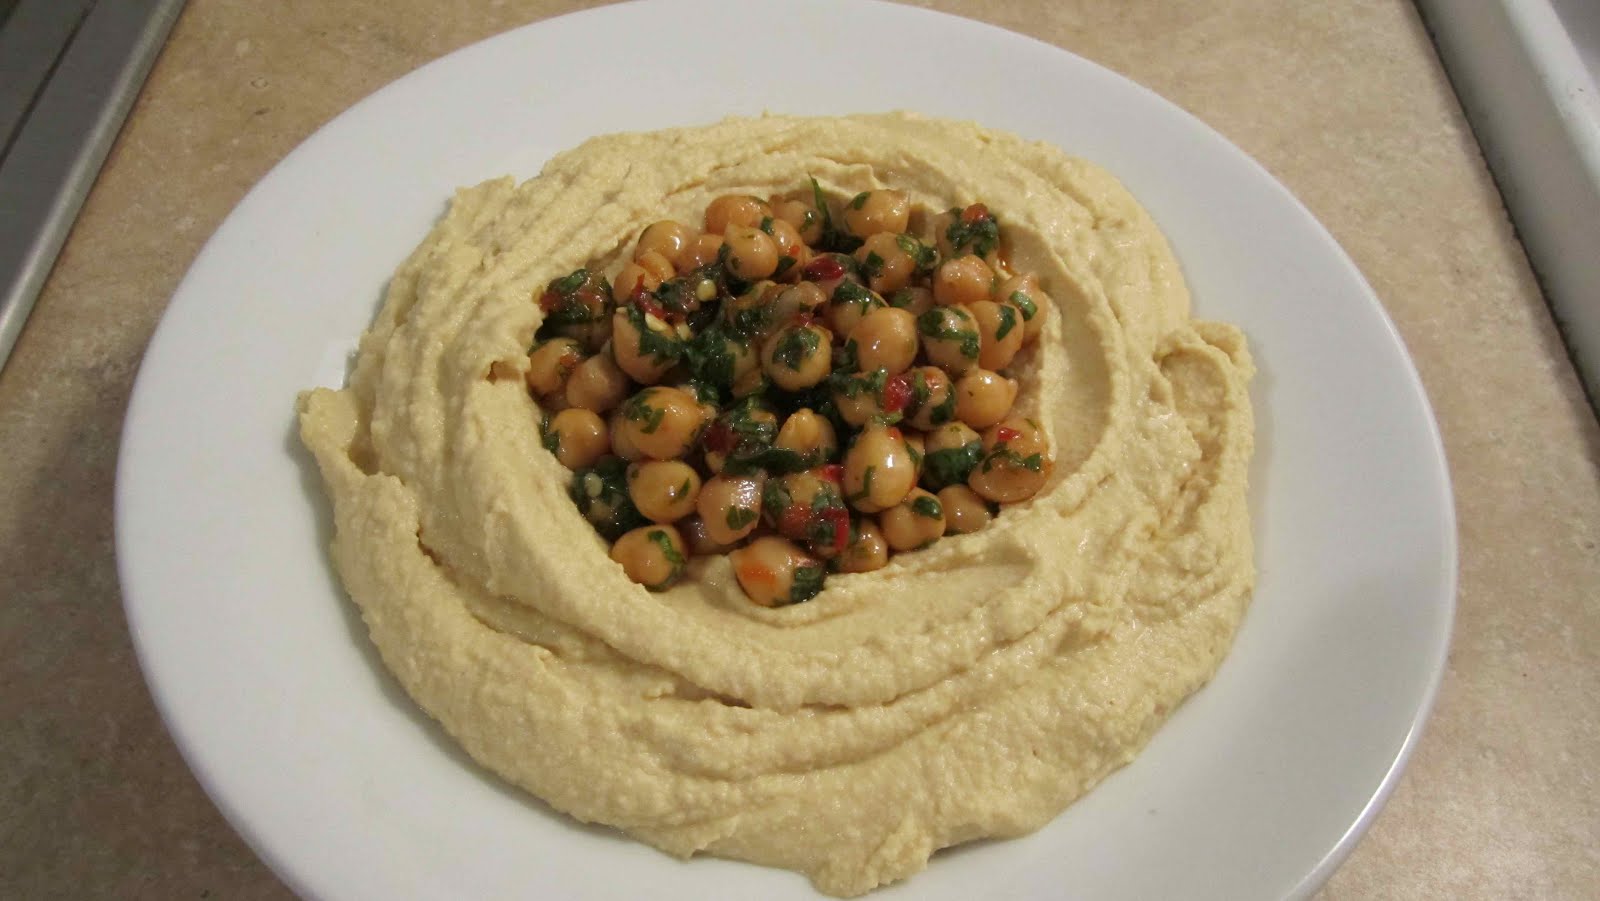
My favorite part about this dish, though, is what I decided to do with the remaining, whole chickpeas. Recalling a recent trip to Mimi's Hummus in Ditmas Park, where I ate a fava bean hummus garnished with some whole favas, I knew that I wanted some textural contrast in my hummus. So I marinated the remaining chickpeas in a mix of sambal oelek (my favorite all-purpose hot sauce--you can use sriracha, harissa, or whatever chile paste you prefer), olive oil, and chopped fresh cilantro and parsely. When I served the hummus, I made a well in the spread and lay the whole chickpeas in the middle. The super smooth hummus, broken up by the toothsome whole chickpeas, makes a winning legume-on-legume combination:


Hummus with Whole Marinated Chickpeas

Serves 8 - 10 as an appetizer

Ingredients:

- 1 1/2 c. dried chickpeas, soaked overnight then cooked for about 1 hour, or until soft, drained, cooking liquid reserved--or use about 3 c. canned
- 2 cloves garlic, smashed and peeled
- About 2 tbsp. tahini
- The juice of about 2 lemons
- About 4 tbsp. cooking liquid
- About 4 tbsp. olive oil, plus more for marinated chickpeas
- Salt, to taste
- About 1 tbsp. hot chile paste such as sambal oelek, sriracha, or harissa
- 1 - 2 tbsp. chopped fresh parsley, cilantro or both

Preparation:

1. Add all but about 3/4 c. chickpeas to bowl of a food processor. Add garlic and pulse to combine.
2. Add tahini, lemon juice and salt and turn machine on. As it is running, pour the cooking liquid and olive oil in through the spout on top. Check for seasoning, adjusting as needed, then leave machine running for about 3 minutes so that hummus becomes very smooth.
3. In the meantime, prepare the marinated chickpeas: combine them with the chile paste, about 1 tbsp. of additional oil, fresh herbs, and salt. If possible, let marinate for 30 minutes to an hour.
4. When ready to serve, spread hummus into a shallow bowl and create a well in the middle. Add marinated chickpeas, drizzle with additional olive oil, and serve.

Monday, January 30, 2012

A good soak

I may have become the shopper I've always wanted to be by making my purchases at the Co-op, but that doesn't necessarily make the me the cook I want to be. Let me explain: my increased access to ingredients like whole grains, healthy oils, organic produce and unprocessed foods--and the low prices for all of this bounty--has certainly led to my cupboards being filled to the bursting, but sometimes those things just find their way in there and stay, never getting the chance to show their stuff in my pots, or in my stomach.

Case in point: dried legumes. Having spent a fair amount of time working on organic farms, where the proprietors grow what they eat and store-bought foods don't often come into the picture, I've eaten some lovely dishes made with dried and soaked beans. And I've noticed that their flavor and texture is exponentially better than the canned stuff. And so when I joined the Co-op, I determined to never again pick up a can of Goya. From now on, I brazenly declared to myself, I will cook exclusively with dried beans! And I lined my shelves with chickpeas, kidney beans, and black eyed peas.

I'm sure you know where this is going. Those bags of beans sat in my cupboards, taunting me, ever since June. Turns out, canned beans are pretty darn convenient: no thinking ahead required. Right? A working farm, though an intensely active place, also has, in its own way, a slower pace than city life, and there's time built into the day to do things like soak some dried beans in water.

The thing is, I don't really even believe the above--that my life is just way too busy to think about my dinner more than an hour before I sit down to eat it. In fact, I do little but think about food and cooking all day long, so I believe I should be able to commit to preparing some beans a day ahead of time.

I had already been stewing over those chickpeas sitting in my kitchen cabinet when I spied a tasty-looking recipe for coconut-braised chickpeas over at the site of my new employer, Serious Eats. The dish sounded like it had some nice flavors going on--lemon, ginger and coconut--and I was keen to try it. The recipe actually called for canned chickpeas, but I would use dried--finally. I knew I would have all the time in the world to cook on Sunday, so on Saturday night, I filled a pot with those clattering little peas, and covered them in twice the amount of water. They'd be (nearly) ready for me when I needed them.

The next day, about an hour before I was ready to cook, I put the pot of chickpeas on the stove, added some salt, and simmered them, covered. Then, as I set to work on the recipe, I simply allowed the garbanzos to steam to toothy perfection before they got to cook for a second time in the dish's flavorful broth.


I used the recipe only as a starting point: though it sounded like a good base, I could tell it would need some punching up. The only spice it called for was ginger and an optional shaking of red pepper flakes, and for me, coconut milk cries out for a complex, heady mixture of aromatics. I also wanted to add some chopped carrot for added sweetness, and some cubed potatoes for some starch to help thicken the broth. The end result was sweet and fragrant, with the tender, creamy chickpeas providing a welcome contrast to the softness of the spinach and the potatoes. Eating it reaffirmed my conviction that cooking with dried legumes is just better. I won't be able to do it all the time--some nights, those ready-to-go Goya beans will still be attractive--but I definitely plan to try this more often. I may not normally possess the virtue of patience, but when it comes to good food, I'm happy to make an exception.


Coconut-Braised Chickpeas with Spinach and Lemon

Adapted (heavily) from seriouseats.com
Serves 4 - 6

Ingredients:

- About 8 ounces dried chickpeas, soaked overnight in 16 oz. water, or one 15-oz. can, drained
- 2 tbsp. vegetable oil
- 2 small (or 1 large) onions, peeled and finely chopped
- 1 carrot, peeled and thinly sliced
- 3 cloves garlic, minced
- 1 tbsp. grated ginger
- 1 large lemon, zested and juiced
- 1/2 tsp. red pepper flakes
- 1/2 tsp. curry powder
- 1/2 tsp. turmeric
- 1/2 tsp. ground coriander
- 3 medium waxy potatoes, scrubbed and cut into a medium dice
- One 14-oz. can coconut milk (I used light--I don't notice the difference)
- About 1 c. water
- 5 oz. baby spinach, rinsed
- Fish sauce (nam pla), to taste
- Salt
- About 1/2 c. unsweetened coconut flakes, toasted, for serving
- Chopped cilantro, for serving
- Cooked white rice, for serving

Preparation:

1. If using dried, soaked chickpeas: about one hour before starting to cook, transfer the chickpeas in soaking liquid to the stove. Add a pinch of salt, cover, and simmer for one hour. As you proceed, leave chickpeas covered.
2. Heat the oil in a large, heavy-bottomed pot (Dutch oven) over medium heat. Add the onions and carrot, stir, and when they begin to soften, add the garlic and ginger. Add the lemon zest and all the spices and cook, stirring, until onions are translucent and spices are toasted and fragrant.
3. Drain the chickpeas and add to the pot along with the potatoes. Add the coconut milk and water, cover, and bring to a simmer. Cook for 15 - 20 minutes, until potatoes are tender.
4. Uncover pot and taste broth. Add a few dashes of fish sauce, to taste, and salt. Add the spinach, cover again, and let wilt. Cook for about 5 more minutes.
5. Turn off heat and stir in lemon juice. Check again for seasoning. Serve over hot white rice, garnished with cilantro and coconut.

Thursday, January 12, 2012

The kitchen sink of stuffed veggie recipes

Recently, while shopping at the Co-op, I noticed some beautiful-looking Delicata squashes, and decided to grab a couple. Though I had never cooked with them, I knew they were among my mom's favorite vegetables, and that she'd be able to recommend a good recipe. And I was right: when I queried her via email, she responded that she bakes them, stuffed with a mixture of cottage cheese, apples, and raisins, then tops them with Swiss cheese, which creates a browned, gooey crust. I liked her idea, but it sounded a little too sweet for me, so using that recipe as a base, I riffed my own version of a stuffing.

First, I sautéed chopped onions and apples in some olive oil, adding some minced garlic and dried thyme once the first ingredients began to break down. Once everything was well cooked, I took some nice clean kale, shredded it up and added it to the pan, covering it to allow the kale to steam. Once that mixture had cooled slightly, I added the rest of the stuffing ingredients: cottage cheese, eggs, breadcrumbs, and grated Parmesan cheese. I portioned this generously between my two halved, par-baked squashes, then topped with more Parmesan cheese, as, well, I didn't have any Swiss. If you wanted to get more decadent, you could add more breadcrumbs to the top along with the cheese, and dot everything with butter before sending it off to the oven. Even if you go that route, you'll still have a pretty virtuous, complete, vegetarian meal:


Baked Stuffed Delicata Squash
Serves 4

Ingredients:
 

2 medium to large Delicata squashes, halved and seeds removed
Olive oil
2 medium onions, peeled and finely chopped
2 medium apples, peeled and finely chopped
2 cloves garlic, minced
1 tsp. dried thyme
1/2 c. raisins
1 bunch of kale, rinsed, thick stems removed, and shredded
About 1 c. cottage cheese, any style
2 eggs
About 1/2 c. breadcrumbs
About 1/4 c. grated Parmesan cheese
Salt
Pepper

Preparation:

1. Preheat the oven to 350
°. Lightly season the squash with salt and pepper, then bake for about 25 minutes or until flesh is slightly tender. (Make sure the squash halves sit flat on the baking pan. If they don't, use a vegetable peeler to trim a strip or two away from the bottom.)

2. Prepare the stuffing: in a large, heavy-bottomed pan, heat about 3 tbsp. olive oil over medium heat. Add the apples and onions; a few minutes later, stir in the garlic, raisins and thyme. Cook, stirring occasionally, for about 5 minutes.

3. Add the shredded kale and cook, stirring occasionally, until kale is mostly wilted, about 5 - 7 minutes. Turn off the heat, cover the pan, and allow mixture to cool slightly.

4. Add cottage cheese, eggs, breadcrumbs, Parmesan, and salt and pepper to taste. Mix well. Remove squash from oven and divide filling evenly among 4 halves. (If you have any leftover stuffing, bake it in a greased dish alongside.) Top squash with more Parmesan, or, if you prefer, Parmesan + breadcrumbs and some dots of butter.

5. Return to oven and bake until squash is tender and stuffing is nicely browned, about 25 more minutes. I served the squash with a brown rice pilaf and a beet salad.

Sunday, January 8, 2012

When life gives you...carrots?

I'm a proud member of the wonderful Crown Heights Farm Share, and I split a winter share with two friends. As such, I'm pretty well covered on root vegetables right now. Just to give you an idea of what farms produce through the cold winter months (or can store through the season), here's an example of what my friends and I received at the last pickup: 5 pounds sweet potatoes, 8 pounds Kueka Gold potatoes, 10 pounds storage carrots, 2 stalks of Brussels sprouts, 2 heads of broccoli, 1 piece of daikon radish, 1 head of Arrow cabbage, 1 bulb kohlrabi, 1 bunch of fresh field carrots, 5 pounds storage beets, 1 head of Napa cabbage, 1 bunch kale, 1 bunch green Romaine lettuce, 1 bunch red Romaine lettuce, 1 bunch green Oak lettuce, and 1 head green Boston lettuce.

As you can see, what we got was a mix of fresh produce (probably grown in a greenhouse or under plastic tarps) as well as storage produce, that's likely being kept in a cool, dark cellar. Getting a winter farm share is interesting, because it gives you some insight into what people were dealing with back in the days of eating truly locally. Although I supplement my share with imported produce like bananas and avocados, I also try to put myself in the mindset of, oh, say, a 19th century self-sufficient farmer, and try to envision what I would do to keep all those dark greens and starchy roots interesting for my family through the cold, dark months.

Altogether, my friends and I got more than ten pounds of carrots, in an array of beautiful colors. Here's my share of the loot:


Figuring out what to do with them wasn't hard. I instantly thought of soup, as most cooks do when faced with a surplus of perishable product. I knew I would cook the carrots down and purée them into something smooth and silky, but I wanted to keep the flavors zingy, as sometimes carrots (especially cooked carrots) can tend towards the blandly sweet. First, I decided that I would roast the carrots in the oven before cooking them in the broth, in order to bring out some of the complexities that high heat imparts to vegetables. Then I decided that I would throw a lot of strong, warming spices in with the usual salt and pepper on my carrots. So after a lot of peeling and chopping, I ended up with this:


That's the carrots, some oil and seasoning, plus generous amounts of whole cumin, coriander and mustard seeds. I tossed them and into the oven they went, emerging burnished and fragrant after about forty minutes. Then I sweated some onions, garlic and grated ginger in some olive oil, added the carrots and enough chicken stock to cover, and simmered for about forty minutes, until the carrots rehydrated and melded with the other flavors in the pot. Then, I busted out my handy immersion blender and puréed it all up, adding dollops of plain yogurt as I went. The end result is a surprisingly complex-tasting soup, warm and spicy from the whole seeds, but also cool and tangy from the addition of the yogurt. I actually think this would be excellent cold, but as it's (sort of) chilly outside, I've been eating it hot:


But wait, I'm not done with my carrot transformations yet! I kept the slender, fresh carrots to the side, cut them into little sticks, and pickled them in a brine made with apple cider vinegar, garlic, mustard seeds and fresh cilantro (I wanted to use dill, but I forgot to buy some). They'll be ready in ten days; I can hardly wait!


Spice-Roasted Carrot Soup with Yogurt
Serves 10 - 12

Ingredients:

3 lbs. carrots, peeled and cut into large, uniform chunks
Grapeseed, canola or other neutral oil
2 tsp. cumin seeds
2 tsp. coriander seeds
1 tbsp. mustard seeds
Salt
Pepper
2 large onions, peeled and cut into a medium dice
2 cloves of garlic, chopped
1 tbsp. grated ginger
About 1 quart chicken or vegetable broth
About 1 1/2 c. plain yogurt
1 lime

Preparation:

1. Preheat the oven to 425°. Toss the carrots with a small amount of oil, the cumin, coriander and mustard seeds, and a generous amount of salt and pepper. Turn out onto a sheet tray and place in the oven, stirring occasionally, for about 40 minutes, or until the carrots are nicely browned. Set aside.

2. When the carrots come out of the oven, heat about 3 tbsp. of olive oil in a large, heavy-bottomed soup pot. Add the onions and stir; a minute or two later, add the garlic and ginger. Cook over medium heat, stirring often, until the onions sweat and break down, about ten minutes. Add the roasted carrots and enough broth to cover. Bring to a boil, then drop to a simmer and cook for about 40 minutes, until carrots plump up again.

3. Use an immersion or standard blender to blend the soup until smooth, adding more chicken stock as needed to maintain a fluid consistency. Work in the yogurt as you go. Squeeze in the juice of the lime and check for seasoning, adding more salt or pepper as needed. Serve hot or cold.


Pickled Carrots
Adapted from Epicurious.com
Makes one jar

Ingredients:

1 lb. carrots, peeled and cut into sticks
1 1/4 c. water
1 c. apple cider vinegar
1/4 c. sugar
1 1/2 tbsp. salt
1 garlic clove, peeled and crushed
1 tsp. mustard seeds
Sprig of fresh herbs, such as dill or cilantro

Preparation:

1. Fill a medium pot with water and bring to a boil. Blanch the carrots in the water for one minute, then remove with a slotted spoon and place in an ice bath, or run under cold water, to stop the cooking.

2. Choose an appropriate-sized glass jar for the carrots and place it and its lid in the boiling water. Boil for about 7 minutes to sanitize, then remove with tongs.

3. Combine the water, vinegar, sugar and salt in a small saucepan and bring to a boil. Turn off heat.

4. Place carrot sticks in jar. They should fit closely together. Add mustard seeds, garlic and fresh herbs to the jar. Using a funnel, pour in the pickling liquid to top of jar, then seal tightly with the lid. The carrots should be left to pickle for about 10 days. Unopened, they will last for several months.

Tuesday, August 9, 2011

A starring role for a supporting cast member

Bread: it's the staff of life. Delicious and nutritious (despite what those Atkins people say), we all love it, we all crave it. But usually, we relegate it to some minor position in our meal; not even as important as a side dish, it's consumed to stave off hunger pangs at the beginning of a meal, or nibbled as a sort of afterthought alongside. It's time to bring bread into the fold, folks, and I aim to do that today by sharing two recent recipes that starred bread as the main character, or at least the equally-billed costar.

First up is a quick lunch I whipped up after returning home from my CSA pickup one week. I had gotten a bunch of beets, and wanted to figure out a way to use the greens, whose flavor I adore. I didn't have much else in the house besides a loaf of whole wheat sourdough and some eggs. So I thought to sauté up the greens and pile them on top of the toasted bread, crowning everything with a runny-yolked poached egg. Here's what it looked like:


And yesterday evening, as I was biking home from a day of new apartment-related errands, I was struck suddenly with August Tomato Fever. It's something we all get around this time of year, I think: the unstoppable urge to eat fresh, sweet and acidic summer tomatoes, all the time, for the rest of the season and, if possible, early into the next one. I realized I hadn't had any local tomatoes yet this year, and was able to find some beautiful mini heirloom ones when I stopped into the Co-op. I didn't want to do much to them--just cut them up, maybe add some basil--and that's when it occurred to me to make a panzanella salad for dinner. One of those classic Italian dishes that comes from poverty (like the bread soup ribollita or pasta with breadcrumbs), this recipe doesn't call for much besides bread (stale, if you have it!), tomatoes, basil, olive oil and balsamic vinegar--plus, more luxuriously if you've got it, fresh mozzarella cheese. I added a little bit of red onion and lemon zest to mine, to brighten the flavors, and what I got was a big bowl of summer, bursting with the brightness of tomatoes and the richness of good olive oil--all without lighting a single burner:


Garlic Toast with Sautéed Beet Greens and a Poached Egg
Serves 1, for lunch or a light meal

Ingredients:

- 1 small bunch of beet greens, rinsed and drained, with any large stems removed, chopped
- 1 thick slice of good bread such as sourdough or whole wheat
- 1 egg
- 1 clove garlic, peeled, plus 1 clove chopped
- Any light vinegar, such as white vinegar, white wine vinegar, or rice wine vinegar, 1/2 tsp.
- Olive oil
- Salt
- Pepper
- Red pepper flakes, optional

Preparation:

1. Prepare the beet greens: heat a small amount of olive oil in pan set over a medium flame. Add chopped garlic plus a sprinkling of red pepper flakes, if desired. After about 20 seconds, add the beet greens and cook, stirring occasionally, until greens are tender, about 6 - 8 minutes.
Season greens to taste and set aside.
2. In the meantime, work on the egg and the toast. Set a small pot of water to the boil, then drop to a simmer. While waiting, toast your bread, then rub it on one side with the garlic clove.
3. When water is at a gentle simmer, add the 1/2 teaspoon of vinegar. Crack egg into a small dish and carefully lower the egg into the water. You can use a spoon to gently encourage the white of the egg to encircle the yolk. Cook at a simmer for about 2 to 3 minutes depending on how runny you like your yolk, then remove with a slotted spoon and drain on paper towels.
4. Assemble the dish: heap the beet greens on top of the garlic-rubbed side of the toast, then add the poached egg. Season egg with salt and pepper, and eat immediately.


Panzanella (Italian Bread Salad with Tomatoes and Mozzarella)
Serves 1 as a main dish, 2 as a side

Ingredients:

- 1/2 loaf of good bread, such as sourdough or Italian-style, stale is fine, cut into large cubes
- 1/2 pint of cherry or grape tomatoes, halved, or any good ripe tomatoes, cut into chunks, about 2 tomatoes
- 1/2 bunch of fresh basil, thinly sliced
- 1/4 red onion, cut into a very small dice
- Zest of half a lemon
- 1 ball of fresh mozzarella, cut into chunks the same size as the tomatoes
- Salt
- Pepper
- Olive oil
- Balsamic vinegar

1. Toast your bread: place bread on a small tray and toast in a toaster oven or the regular oven until just crisp, about 4 minutes. Set aside.
2. Toss tomatoes with a small amount of salt and pepper, and set aside for a few minutes to allow the tomatoes to "marinate" and give off some juice.
3. Combine bread, tomatoes, basil, red onion, and lemon zest in a bowl. Toss with olive oil, balsamic vinegar, salt and pepper to taste: you want the salad to be nice and juicy, and will probably need around 4 tablespoons olive oil and 1 tablespoon vinegar.
4. Just before serving, arrange the mozzarella over the top of the salad.

Saturday, July 30, 2011

Whole grain goodness, in shades of pink

In my last post I talked about the wonderful CSAthat's the Crown Heights CSA, to be exactthat I joined at the beginning of the summer. The produce I've been picking up weekly has been unfailingly fresh, great looking and even better tasting, and this Tuesday's haul was no exception. Among other items, I received a thick, verdant bunch of scallions, a large handful of palely golden wax beans, and three fat beetsone of my favorite vegetables of all time. With temperatures holding steady in the 90s the whole week, I knew that these veggies were destined to be eaten cold. The question was how to bring them together into harmony.

I thought about the different kinds of cold salads that we eat during the summerbeets with goat cheese, a pasta salad to chuck the beans intoand immediately dismissed them as been there, done that. I wanted to try something new. That's when I remembered the cold rice salads that my mom often made when I was growing up, usually with brown rice, vegetables, toasted nuts, etc. (my mother was really ahead of the curve when it came to eating and enjoying whole grains). I decided to take a cue from her, but also to go a step further into unknown territory by using a less common grain. My first thought was spelt, but the only version the Co-op carried was imported from Italy and a small bag cost a whopping six dollars. Right nearby, though, was a bag of equal size of wheatberries, priced to move at an incredible 55 cents. That's my kind of deal, people! I grabbed it up.

At home, I simmered the wheatberries in salted water for about 40 minutes (contrary to popular belief, wheat berries do not need to be soaked before cooking) until they were tender, then drained them and allowed them to cool. In the meantime, I boiled up my beets, peeled and diced them, and cut up and blanched my wax beans. I combined everything in a big bowl, adding liberal amounts of sliced scallions and chopped parsley, as well as a lemon-olive oil dressing. And then I took a picture:


But the story didn't end there, folks: oh no, it had just begun. You see, I wanted to take the photo a) while there was still natural light; and b) before the beets totally took over and dyed everything magenta (as opposed to the early, and still quite beautiful, subtle stage of blush that you see here). But there were more things to come for this salad: right before serving it, I dotted the top with fresh Spanish goat cheeseyou could also use something like feta or ricotta salataand sprinkled on some chopped toasted walnuts. With the snap of the beans, the sweetness of the beets, the nuttiness of the wheat berries and the creaminess of the cheese, I'd say this summer salad definitely achieved the harmonynay, the symphonythat I was looking for.


Wheatberry Salad with Beets, Wax Beans and Fresh Cheese
Serves 6 - 8 as a side dish, 4 as a main

Ingredients:
1 cup wheatberries, picked through to remove any debris or hard grains
1/2 lb. wax beans, trimmed and cut into halves or thirds depending on length (or substitute green beans)
3 large beets, trimmed and cut into quarters, but not peeled
3 scallions, white and green parts, thinly sliced
1/2 bunch parsley, finely chopped
Juice of 2 lemons
Olive oil
Salt
Pepper
4 oz. fresh cheese, such as goat or sheep's milk, or use a mild feta or ricotta salata, cut into cubes or broken up into pieces
1/2 cup walnut pieces, toasted and chopped

Preparation:

1. Fill a medium pot with water and set it to boil. Add a generous amount of salt, then add the wheatberries. Drop to a simmer and cook, stirring occasionally, for about 40 - 50 minutes, or until wheatberries are tender. Drain and allow to cool.

2. In the meantime, fill a second medium pot with water. Set it to boil and salt generously. Drop in the beans and cook for exactly two minutes. Remove with a slotted spoondo not drain, you'll need the water for the beetsand immediately rinse beans with very cold water to stop the cooking process.

3. Bring the bean water back to a boil and add the beets. Cook for about 20 minutes or until the beets are tender. Drain beets, then place them in a bowl while they are still hot. Cover bowl with a large plate (or with plastic wrap) and let the beets steam up as they cool down. This will make it a cinch to peel them. When cool enough to handle, peel beets and cut them into small pieces.

4. When wheat berries, beans and beets are cooked and cooled, combine in a large bowl. Add the scallions and parsley.

5. In a small bowl, combine the lemon juice with olive oil to taste, probably about the same quantity, or slightly more, as of the lemon juice. Season generously with salt and pepper. Pour over salad, and stir to combine. Chill in fridge until ready to eat.

6. Before serving, garnish the salad with the cheese and the walnuts.

Thursday, July 21, 2011

Back, with a bushel of zucchini

I've been back in the States almost two months now and this is the first free moment I've found to write on the blog. Life has been a flurry, of moving around, job hunting, catching up with friends and visiting all the New York spots that I missed while I was away. But things are finally taking on a sense of normalcy, allowing me some time to tell you about something important: summer zucchini.

When I got back from France, I did two things almost immediately: one, became a member of the Park Slope Food Co-op, that alternately venerated and misunderstood Brooklyn temple of local and organic food; and two, signed up for a CSA share of local fruit and vegetables. Having spent a long time in Europe, where, it seems to me, people are both more passionate and more discriminating than the majority of us Americans when it comes to the quality of their food, I would say that my growing interest in healthy, sustainable produce pretty much reached its peak. I didn't want to go back, upon returning home, to eating ordinary supermarket items flown in from California or Argentina or wherever. And I haven't looked back.

Anyone even marginally familiar with vegetable gardening knows about summer squash and, well, what a beast it is, basically. This vegetable (I suppose it is biologically a fruit) just erupts out of the ground come late June, fruiting and fruiting and producing tons of zucchinis. Gardeners sometimes don't know what to do with all their bounty, giving them away to neighbors, turning them into breads and cakes. There are even numerous gardeners' sayings about zucchini (here's a sample one "Zucchinis, terrific/Like bunnies, prolific!"). I've grown zucchini myself so I know this to be true, and just in case I'd forgotten, my weekly CSA share has certainly reminded me. For weeks now we've been getting bunches of small squash in all varieties: yellow and green; pattypan, crookneck, and everything in between. Fortunately for me, I love zucchini. Not so fortunately, I've been super busy at work lately, leaving little time to cook. So quite inadvertently, a small stockpile of squash began building up in my refrigerator's crisper drawer, until I finally found the time, yesterday, to deploy my arsenal.

Like any true NYC summer, this one, so far, has been humid and blazing hot. So what I wanted from my zucchini was something to cool me down. I improvised a simple chilled soup, first sautéing chopped green onions and garlic (also from my CSA) in olive oil, then adding a whole mess of chunked zucchini. I let that sweat down just a little bit, then added water almost to cover (the zucchini will let out a lot of liquid as it cooks, so you want to be careful not to add too much water). Once the squash was tender, I puréed the soup in batches in the blender, adding a couple of dollops of plain yogurt, plus a few fresh mint leaves and some additional seasoning, as I went. When everything was smooth and light green, I let the soup chill in the fridge before enjoying it with some homemade croutons. Say hello to my new favorite summer lunch:


Chilled Summer Squash Soup with Yogurt and Mint

Serves 8

Ingredients:

- 4 tbsp. olive oil
- 1 bunch scallions, trimmed of any brown or stringy parts, roughly chopped
- 3 cloves garlic, chopped
- 3 lbs. summer squash of any variety, chopped into rough pieces
- Water
- Salt
- Pepper
- About 1 cup plain yogurt
- A handful of fresh mint leaves, washed

Preparation:

1. In a large, deep, heavy-bottomed pot, heat the olive oil over a medium flame. Add the scallions and stir; add the garlic a few minutes later. Season with some salt and saut
é for a few minutes, until the scallions start to break down.
2. Add the squash along with a few pinches of salt and a few grinds of pepper and stir to combine. Let the squash sweat for 4 or 5 minutes, then add just enough water to almost cover the squash, about 4 cups. Cover and bring to a boil, then drop to a steady simmer and leave partially covered.
3. Cook soup until squash is just tender, about 15 minutes. Turn off the heat and, working in batches, ladle the soup into a blender (you can also leave the soup in the pot and use an immersion blender). Pur
ée, adding a dollop of yogurt, plus a few mint leaves and additional seasoning, with each batch. If the soup is looking too thin, try to leave behind some of your cooking liquid, and if too thick, add more.
4. Check soup for seasoning and allow to chill in the fridge for several hours. Serve, garnishing with additional chopped mint and, preferably, some homemade croutons (see recipe below).


Homemade Croutons
Makes two cups

Ingredients:

- Day-old bread, preferably crusty (ie, a baguette), cut into small cubes and yielding 2 cups
- 3 tbsp. olive oil
- Salt
- Pepper
- Dried herbs, such as thyme, oregano, sage, etc.

Preparation:

1. In a bowl, toss the bread cubes with the olive oil, a generous amount of salt and pepper, and a sprinkling of the herbs. Make sure each cube is coated in oil.
2. Place bread cubes in a large wide skillet set over medium-low heat and cook, tossing occasionally, for about 6 - 10 minutes, or until bread is fragrant, golden, and crunchy. Let cool completely before serving.
3. Alternatively, you can bake the croutons in a 325
° oven. Set bread cubes on a sheet tray and bake, stirring occasionally, for about 6 - 10 minutes, or until bread is fragrant, golden, and crunchy. Let cool completely before serving.

Sunday, March 27, 2011

It was supposed to be so simple

I had it all planned out: I would write a short, sweet little post about spring coming to Toulouse, the bounty of beautiful produce it's brought with it, and the delicate, yet unfussy, dish I would prepare with pristine white asparagus, a true harbinger of spring if ever there was one. Here, have a look at it, I invite you. Pretty stunning, no?


There I was at the Marché Cristal, a lively, sprawling open-air market near my house, on a recent sunny morning, agape with wonder at all the new arrivals on display, and rendered nearly paralyzed with indecision at what to buy first: the slender green artichokes, leaves still attached, displayed like so many bouquets of flowers? The huge, curling pods of fava beans, or fèves, overflowing and nearly tumbling down from their slatted cases? How about a small container of perfect, sweet yet tart strawberries, real strawberries, the likes of which you hardly ever find in the United States these days?


Somehow, I pulled myself together and made my purchases, starting, yes, with those lovely fraises, which I devoured in about three minutes upon reaching home, and finishing up with the bunch of asparagus pictured above. It was nearly lunchtime by the time I got home, and I was hungry, those berries not really having tided me over. I quickly trimmed up the asparagus, snapping the tough ends off, and threw them in a steamer to cook for, I wagered, about 12 minutes, until they were just tender. In the meantime, thought I, I'll put a little pot of water on the boil for a soft-cooked egg, which I envisioned as the perfect accompaniment to my asparagus, slumping gently over them, lubricating them with its rich yellow yolk. Sounds like a plan, no?

Well, sometimes even the most carefully thought out plans don't turn out the way we intend. You see, I had never actually cooked white asparagus before, and rather brashly assumed that its method of preparation was identical to that of its verdant cousin. And so when I tested a blond spear after about 10 minutes--lifting it from the steamer to see if it would bend ever-so-slightly--I could see that something was wrong. The tips of the asparagus seemed nice and tender, but the bottom part of the stem was still rather the same texture as it was when raw: woody and unyielding. "Well, OK," I thought to myself, "I'll just let them steam a little longer." Checked them again after ten minutes. No real discernible change. Abandoned my steaming mission and chucked the little devils right into the boiling water at the bottom. Ten more minutes, and it became clear that there was no salvaging this situation. I drained the little buggers, laid them out nicely on a plate as intended, draped them with lemony vinaigrette, and garnished them with some sliced tomatoes. I should add, at this point, that my frustration with the asparagus caused me to totally forgot about my lovingly cooked soft egg, and what I now had was a hard-cooked one. I saved it for later. I made another soft egg. And what I got, finally, was this:


It doesn't look bad, does it? And see, it didn't taste bad, either. But the only edible part of the asparagus was the top half. The bottom half I had to sort of pull through my teeth, much as one eats a steamed artichoke leaf, to scrape out the interior softness and leave behind the tough, fibrous exterior. A lot of work for a lot of waste. It was a shame. And so as soon as I finished eating, I looked up the correct method of preparing white asparagus. Turns out that even the slenderest stems possess a hard outer peel that must be removed--with a knife--before cooking. It would have been nice to know that before, but I know it now. And so I've provided the emended recipe below. Here's hoping your maiden white asparagus voyage encounters smooth seas.


Steamed White Asparagus with a Soft-Cooked Egg
Serves 1

Ingredients:

- 1 small bunch fresh white asparagus (10 - 12 spears)
- 1 egg
- Vinaigrette made with mustard, lemon juice, salt and olive oil
- Sliced fresh tomatoes, for serving (optional)

Preparation:

1. Trim and peel the asparagus: as mentioned above, this step is indispensable and it's important to do it correctly. First, trim the bottom 1 inch from the asparagus spears. Then, using a small, sharp paring knife, peel the outer layer off, stripping the stem from the bottom up. Continue peeling nearly to the top of the spear.
2. Steam the asparagus: in a large, wide pot or pan, heat about 2 inches of water over high heat. When it boils, salt it, drop in the asparagus, cover and drop to a lively simmer. Steam, covered, until spears are tender, about 15 to 20 minutes.
3. Meanwhile, soft-boil the egg: place egg in a small saucepan and fill with cold water to cover. Place over medium-high heat; cover. When water boils, drop to a simmer and cook egg for exactly 8 minutes. Drain and immediately run egg under cold water to stop the cooking. When egg is cool, peel.
4. Drain asparagus and arrange warm spears on a plate, drizzling with about 3 teaspoons vinaigrette. Season with salt and pepper. Slice egg into halves or quarters and arrange over the asparagus. Serve with sliced tomato, if desired.