Monday, February 13, 2012

More fun with chickpeas

My friend Mathilde's birthday was last Friday, and we had a small party to celebrate. As is usual, when we gather at Willy's house, food played a supporting starring role. As a sort of group effort, we all pitched in to make a big pot of tortilla soup with all the fixins, Willy made another ridiculously intricate and delicious layer cake, and I decided to contribute some hummus that I prepared at home earlier in the day. Inspired by my recent success cooking with dried, soaked chickpeas, I decided to go that route with my hummus, in lieu of canned garbanzos. I soaked and cooked some more chickpeas, then drained them, reserving the cooking liquid. I tipped most of the legumes into my food processor, keeping back about a cup of them, and made my standard hummus by adding garlic, tahini, lemon juice, olive oil and some of the cooking liquid. After tasting and adjusting the flavors to my liking, I let the food processor run for a long time, whipping the hummus into a dense, silky purée. The dried chickpeas contribute a better texture and a fuller flavor to the spread.

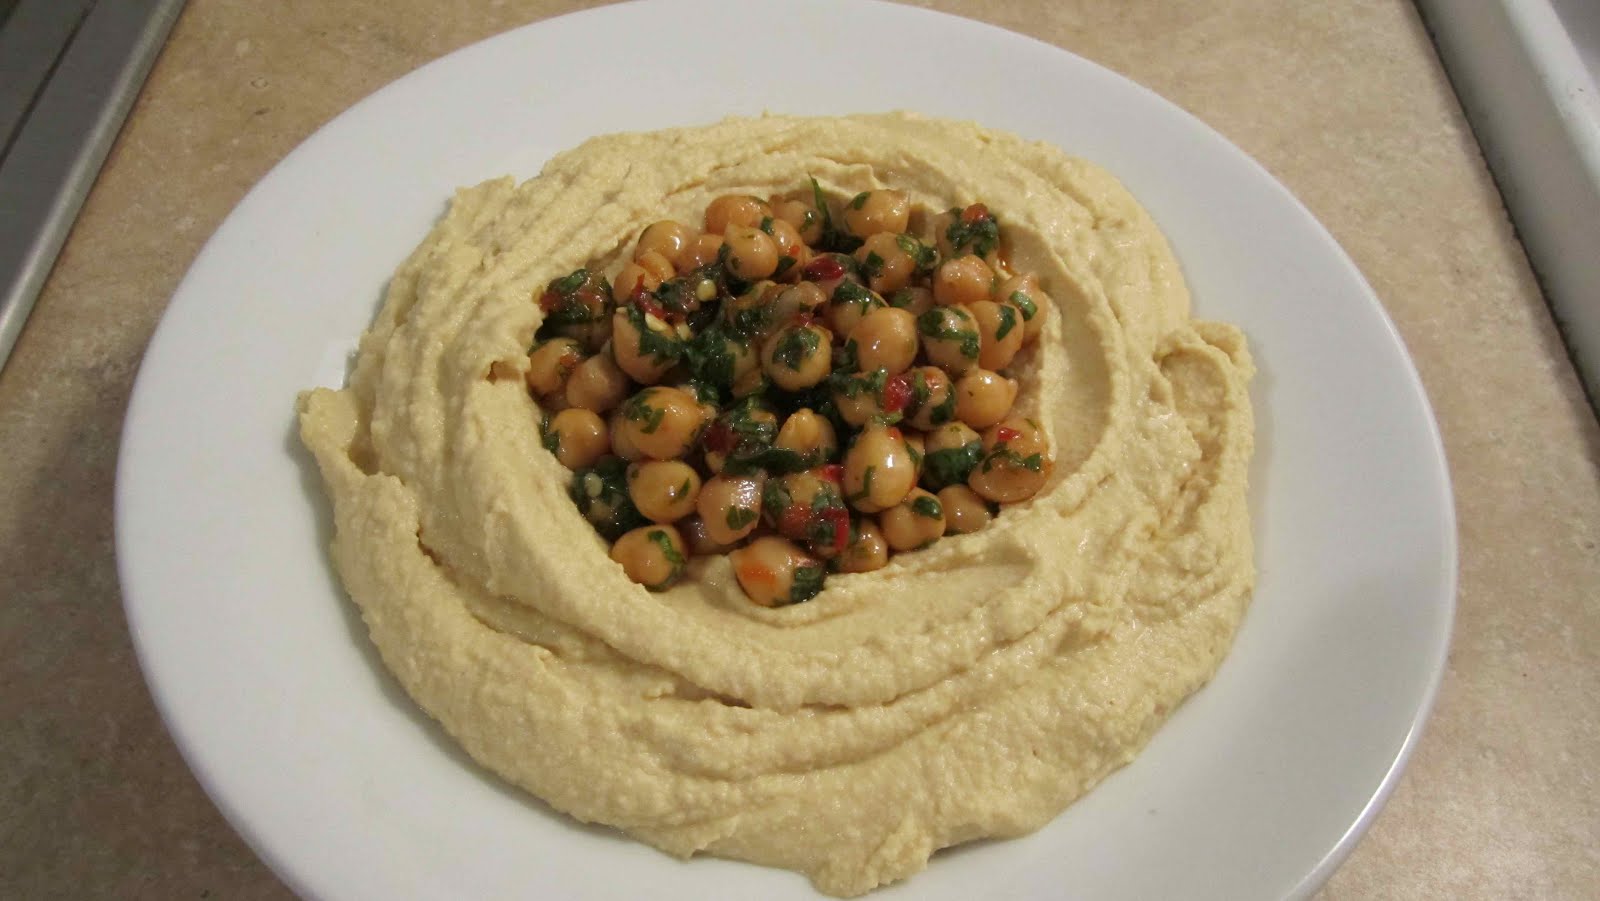
My favorite part about this dish, though, is what I decided to do with the remaining, whole chickpeas. Recalling a recent trip to Mimi's Hummus in Ditmas Park, where I ate a fava bean hummus garnished with some whole favas, I knew that I wanted some textural contrast in my hummus. So I marinated the remaining chickpeas in a mix of sambal oelek (my favorite all-purpose hot sauce--you can use sriracha, harissa, or whatever chile paste you prefer), olive oil, and chopped fresh cilantro and parsely. When I served the hummus, I made a well in the spread and lay the whole chickpeas in the middle. The super smooth hummus, broken up by the toothsome whole chickpeas, makes a winning legume-on-legume combination:


Hummus with Whole Marinated Chickpeas

Serves 8 - 10 as an appetizer

Ingredients:

- 1 1/2 c. dried chickpeas, soaked overnight then cooked for about 1 hour, or until soft, drained, cooking liquid reserved--or use about 3 c. canned
- 2 cloves garlic, smashed and peeled
- About 2 tbsp. tahini
- The juice of about 2 lemons
- About 4 tbsp. cooking liquid
- About 4 tbsp. olive oil, plus more for marinated chickpeas
- Salt, to taste
- About 1 tbsp. hot chile paste such as sambal oelek, sriracha, or harissa
- 1 - 2 tbsp. chopped fresh parsley, cilantro or both

Preparation:

1. Add all but about 3/4 c. chickpeas to bowl of a food processor. Add garlic and pulse to combine.
2. Add tahini, lemon juice and salt and turn machine on. As it is running, pour the cooking liquid and olive oil in through the spout on top. Check for seasoning, adjusting as needed, then leave machine running for about 3 minutes so that hummus becomes very smooth.
3. In the meantime, prepare the marinated chickpeas: combine them with the chile paste, about 1 tbsp. of additional oil, fresh herbs, and salt. If possible, let marinate for 30 minutes to an hour.
4. When ready to serve, spread hummus into a shallow bowl and create a well in the middle. Add marinated chickpeas, drizzle with additional olive oil, and serve.

Thursday, February 9, 2012

Claudia Roden's orange and almond cake

When you're as food-obsessed as I am, it makes sense to surround yourself with people on your wavelength, so it comes as no surprise that some of my closest friends also happen to be excellent cooks/bakers/snackers. My adventures in cooking with my pal Gideon have been widely chronicled on this site. Patricia, who sadly lives in France nowadays, is the queen of hosting potlucks, and Mathilde, who lives in New York but hails from Paris, is the master of the quiche and makes a mean crêpe, to boot. Just to mention France one more time, Bonnie and I founded a dinner club together with our friends in Toulouse last year, and I think it's safe to say that her dinners were the most heavily anticipated--she made a mapo dofu last Chinese New Year that blew my mind (and, to a certain extent, my tongue--those Sichuan peppercorns can be fiery!) Despite all these heavyweight contenders, I think it's actually my friend Willy who can go head to head with me in terms of food fixation. He and I cook together all the time, and when I need a culinary companion for a far-flung peregrination to Queens or deep south Brooklyn, he's usually game to make the trek with me.

Willy also happens to be an excellent baker. He's prepared my birthday cakes sever
al times--this past year, it was a white layer cake filled with homemade raspberry jam and draped with homemade marzipan. His no-knead bread, which he makes routinely, puts mine to shame, and I've also tasted potato bread, rye bread, and Anadama bread that he's made. A few months ago, I was over at Willy's for lunch, and for dessert he served a beguiling orange and almond cake the likes of which I had never tasted: it had a ton of texture from the ground almonds, a powerful perfume from the oranges, and an underlying bitterness to complement its sweetness. What most attracted me about this cake, though, was the unusual way in which it was made: Willy told me that to make the batter, he boiled two whole oranges for hours, then ground them up, peels and all, to incorporate into the cake mix. That slight bitterness I tasted was coming from the orange pith. I loved the idea of this recipe, and I had to try it.

Several weeks later, I found the occasion to make it: I was attending a Rosh Hashanah dinner at my cousins' house in New Jersey, and I volunteere
d to bring a dessert. I picked up the ingredients I knew I would need, and then called Willy to confirm the method of preparation. As I simmered the oranges in boiling water, an intense, almost incense-like fragrance filled my apartment. I couldn't wait to taste this cake. When the oranges were ready, I puréed them in the food processor, then set them in the fridge to cool as I worked through the rest of the recipe: grinding the almonds, separating the eggs. Then I put the whole thing together, poured it into a pan, and slid it into the oven to bake.

All that work had made me hungry, so I peered into the fridge to see what I could make myself for lunch. And that's when I saw it: that bright, vivid, luscious-smelling orange purée, still cooling in my fridge. Very distinctly not baking in my cake. My heart fell. Who needs a plain old almond cake? I thought. It's been done!

When my boring, stupid almond cake emerged from the oven about 45 minutes later, I tried to salvage the situation. I mixed some of the orange
purée with some water and sugar, in an attempt to make a glaze. I poked some holes in the still-warm cake and brushed on the glaze, hoping that it would imbue the cake with its citrusy freshness. And in the end, of course, the cake was fine--but it barely tasted of orange. It lacked that exotic quality that the cake I'd tasted at Willy's had in spades.

Luckily, I was able, through my haze of anger, to have the foresight to stick the rest of the unused orange purée in a container in the freezer, to be deployed at some other time. I finally got my chance this past weekend, when my brother hosted a cassoulet party at our parents' house. Bravely, I volunteered, yet again, to bring dessert. I went through all the same steps, but of course, this time I remembered to include that precious orange purée in my confection. I also adjusted the cooking time and temperature a little bit, remembering that while Willy's cake had a more crumbly texture, I was looking for a softer one in mine. And I'm happy to report that the end result was just as glorious I had hoped for all those many months ago when I first made the cake: moist, fragrant and vivid in color from the orange peel and egg yolks, this cake truly has the power to transport you to the Middle East.


Middle Eastern Orange and Almond Cake

Adapted slightly from this recipe
Makes one cake

Ingredients:

- 2 oranges
- 6 eggs, separated
- 1 1/2 c. ground almonds
- 1 c. sugar
- 1 tsp. baking powder
- 1/2 tsp. vanilla extract
- 1/2 tsp. almond extract
- 1/2 tsp. ground cinnamon
- 1/2 tsp. salt

Preparation:

1. Preheat the oven to 375°. Prepare a medium spring form pan: butter the bottom and sprinkle with additional almond meal.
2.
Wash oranges thoroughly, place them in a pot, cover with water and boil for 2 hours. Remove from water, cut open and remove seeds, then purée in a food processor until completely smooth. Set aside.
3. Combine ground almonds, orange purée, egg yolks, sugar, baking powder, vanilla, almond extract, cinnamon, and salt in a large bowl, mixing well.
4. Whip egg whites to somewhere between soft and stiff peaks. Fold gently, in two batches, into the yolk mixture. Pour into prepared pan and bake for 45 minutes or until top is well browned but center still appears moist.

Tuesday, February 7, 2012

How to make almond flour

Got a recipe that calls for almond flour but all you've got in the pantry are whole, skin-on almonds? No problem. Or maybe all you have are blanched almonds? Even easier. If you've got a food processor, you've got almond flour. Well, almost.

For those in the skin-on camp, what you've got to do, is, well, blanch the almonds. Far from being a specialized process that can only occur in some mechanized factory, blanching and skinning almonds is a breeze. First, fill a pot with enough water to cover your almonds. Cover it and heat it to boiling. Drop in your almonds and set a timer for 45 seconds:


Drain the almonds and dump them out onto a towel:


When they're cool enough to handle, all you have to do is rub off the skins with your fingers. If you've ever shelled fresh beans like favas, the process is almost exactly the same: you sort of grip the almonds between your thumb and forefinger and push. It'll slide right out of its skin:


And now you've got a whole mess of pristine blanched almonds (or, if you started out with those, they'd look something like this):


When they've cooled completely, place them in the bowl of the food processor, fitted with the normal blade. Pulse until the almonds become flour. Don't overprocess, as this will result in (pale, inferior) almond butter!


So now that you've got almond flour, how will you use it? I used mine in this. Stay tuned for that post, up next!

Monday, January 30, 2012

A good soak

I may have become the shopper I've always wanted to be by making my purchases at the Co-op, but that doesn't necessarily make the me the cook I want to be. Let me explain: my increased access to ingredients like whole grains, healthy oils, organic produce and unprocessed foods--and the low prices for all of this bounty--has certainly led to my cupboards being filled to the bursting, but sometimes those things just find their way in there and stay, never getting the chance to show their stuff in my pots, or in my stomach.

Case in point: dried legumes. Having spent a fair amount of time working on organic farms, where the proprietors grow what they eat and store-bought foods don't often come into the picture, I've eaten some lovely dishes made with dried and soaked beans. And I've noticed that their flavor and texture is exponentially better than the canned stuff. And so when I joined the Co-op, I determined to never again pick up a can of Goya. From now on, I brazenly declared to myself, I will cook exclusively with dried beans! And I lined my shelves with chickpeas, kidney beans, and black eyed peas.

I'm sure you know where this is going. Those bags of beans sat in my cupboards, taunting me, ever since June. Turns out, canned beans are pretty darn convenient: no thinking ahead required. Right? A working farm, though an intensely active place, also has, in its own way, a slower pace than city life, and there's time built into the day to do things like soak some dried beans in water.

The thing is, I don't really even believe the above--that my life is just way too busy to think about my dinner more than an hour before I sit down to eat it. In fact, I do little but think about food and cooking all day long, so I believe I should be able to commit to preparing some beans a day ahead of time.

I had already been stewing over those chickpeas sitting in my kitchen cabinet when I spied a tasty-looking recipe for coconut-braised chickpeas over at the site of my new employer, Serious Eats. The dish sounded like it had some nice flavors going on--lemon, ginger and coconut--and I was keen to try it. The recipe actually called for canned chickpeas, but I would use dried--finally. I knew I would have all the time in the world to cook on Sunday, so on Saturday night, I filled a pot with those clattering little peas, and covered them in twice the amount of water. They'd be (nearly) ready for me when I needed them.

The next day, about an hour before I was ready to cook, I put the pot of chickpeas on the stove, added some salt, and simmered them, covered. Then, as I set to work on the recipe, I simply allowed the garbanzos to steam to toothy perfection before they got to cook for a second time in the dish's flavorful broth.


I used the recipe only as a starting point: though it sounded like a good base, I could tell it would need some punching up. The only spice it called for was ginger and an optional shaking of red pepper flakes, and for me, coconut milk cries out for a complex, heady mixture of aromatics. I also wanted to add some chopped carrot for added sweetness, and some cubed potatoes for some starch to help thicken the broth. The end result was sweet and fragrant, with the tender, creamy chickpeas providing a welcome contrast to the softness of the spinach and the potatoes. Eating it reaffirmed my conviction that cooking with dried legumes is just better. I won't be able to do it all the time--some nights, those ready-to-go Goya beans will still be attractive--but I definitely plan to try this more often. I may not normally possess the virtue of patience, but when it comes to good food, I'm happy to make an exception.


Coconut-Braised Chickpeas with Spinach and Lemon

Adapted (heavily) from seriouseats.com
Serves 4 - 6

Ingredients:

- About 8 ounces dried chickpeas, soaked overnight in 16 oz. water, or one 15-oz. can, drained
- 2 tbsp. vegetable oil
- 2 small (or 1 large) onions, peeled and finely chopped
- 1 carrot, peeled and thinly sliced
- 3 cloves garlic, minced
- 1 tbsp. grated ginger
- 1 large lemon, zested and juiced
- 1/2 tsp. red pepper flakes
- 1/2 tsp. curry powder
- 1/2 tsp. turmeric
- 1/2 tsp. ground coriander
- 3 medium waxy potatoes, scrubbed and cut into a medium dice
- One 14-oz. can coconut milk (I used light--I don't notice the difference)
- About 1 c. water
- 5 oz. baby spinach, rinsed
- Fish sauce (nam pla), to taste
- Salt
- About 1/2 c. unsweetened coconut flakes, toasted, for serving
- Chopped cilantro, for serving
- Cooked white rice, for serving

Preparation:

1. If using dried, soaked chickpeas: about one hour before starting to cook, transfer the chickpeas in soaking liquid to the stove. Add a pinch of salt, cover, and simmer for one hour. As you proceed, leave chickpeas covered.
2. Heat the oil in a large, heavy-bottomed pot (Dutch oven) over medium heat. Add the onions and carrot, stir, and when they begin to soften, add the garlic and ginger. Add the lemon zest and all the spices and cook, stirring, until onions are translucent and spices are toasted and fragrant.
3. Drain the chickpeas and add to the pot along with the potatoes. Add the coconut milk and water, cover, and bring to a simmer. Cook for 15 - 20 minutes, until potatoes are tender.
4. Uncover pot and taste broth. Add a few dashes of fish sauce, to taste, and salt. Add the spinach, cover again, and let wilt. Cook for about 5 more minutes.
5. Turn off heat and stir in lemon juice. Check again for seasoning. Serve over hot white rice, garnished with cilantro and coconut.

Sunday, January 22, 2012

26 years + 1 complicated recipe

Earlier this month I turned 26 years old and over the weekend I celebrated with friends by throwing a somewhat belated birthday party. Over the past few years I've developed a tradition for my birthday: I invite over a ton of people and then stress myself out by committing to cooking them a huge dinner feast. It's an interesting way to fête my own birthday, I admit, but I'm mostly kidding about the stressful part: in fact, I enjoy making large, complicated meals. Years of producing food on a huge scale as a freelance caterer have made the feat of preparing a meal for 20 people seem like a piece of cake.

In the years that I've been writing on this blog, I've made pork, pork, and legumes for my birthday parties. This year, I wanted to try something different, something a little out of my comfort zone. I'm not as impoverished this year as I was last, so I could afford to buy and serve flesh, and I decided on something that most meat eaters deem commonplace, even mundane: chicken. You see, I've been eating mostly vegetarian for the past few months, and I found that the first thing to disappear from my diet with me hardly even noticing was chicken. It's always been my least favorite meat: I prefer proteins that pack a wallop of flavor, like pork, lamb, and game such as rabbit and venison. I simply find chicken dull, and before my party I honestly can't remember the last time I cooked or ate it. So, of course, that meant that I was sort of craving chicken, after all this time. But since it takes a lot to make chicken exciting, I wanted to impart as much flavor as possible to the meat. Here are some of the ingredients I used in the dish; can you guess what I made?


Not sure yet? Maybe this will clue you in:


Chocolate...? In a savory dish...? Why, it must be mole! Yes, for my birthday I prepared chicken mole poblano, meaning that the recipe comes from Puebla, in Mexico. You see, most people are familiar with mole poblano because of its inclusion of sweet chocolate, which most people wouldn't ordinarily associate with a spicy, savory dish. But in actuality the chocolate forms only a very small proportion of the ingredients, which also include (from top) three types of dried chiles; a spice blend made of whole toasted spices (sesame seeds, chile seeds, cloves, anise seeds, peppercorns, cloves, thyme, oregano, bay leaves, and cinnamon) which are then ground; fried almonds, peanuts, pumpkin seeds, and raisins; and fried bread and corn tortillas. Only at the very end of the hours-long cooking process is a small amount of chocolate and sugar stirred into the nearly-completed sauce.


Another misconception about mole is that poblano--the best-known type--is the only type. In fact, there are many many types of moles--really just a base sauce that meat is then cooked in--prepared all over Mexico, depending on the region and which ingredients are available there. Some other types include negro (black, includes similar ingredients to the poblano but adding dried prunes and ripe plantain); rojo (red, heavier on the tomatillos and also including not a small amount of rendered pork lard); amarillo (yellow, with ground cumin and corn flour); colorado ("colored," with fresh herbs); and verde (green, with fresh green chiles, cilantro, and green pumpkin seeds), among many other varieties. So...now you know. Tell your friends about mole.


I did, however, want to stick with the classic and widely recognized poblano version of this dish. Always served over chicken or turkey, this sauce is incredibly complex-tasting, thanks to its many ingredients. It's not an easy thing to make--it's very time consuming and demands a measure of organization and thoughtful planning--but neither is it as complicated as it might first appear when you read through the recipe. Very basically, you first create a spicy chile sauce made from the fried, then rehydrated and puréed dried chiles, and then you make a sweet sauce from the nuts, dried fruit, and floral spices. Only at the very end do you combine these two sauces and then reduce the result into a silky mixture that is both hot and sweet at the same time.

I talk a lot of game on this site about how I don't follow recipes, preferring instead to follow my muse wherever she might lead me and charting my own way as I go. It's a talent I'm proud of, because it's pretty much my only creative outlet: I don't play music, make art or write anything that's nonfiction. As important as that skill is to me, though, it's also immensely satisfying, once in a while, to cook from a recipe, particularly one that's foreign to me and that I probably wouldn't be able to riff on my own. The mole was a perfect example of such a dish. In the initial stages of the cooking process, I was kind of groping along blindly; I had an idea of where I needed to go, but I wasn't altogether sure how to get there. As I progressed, though, I began to see how everything would come together in the end. A recipe like this is really like a puzzle: you can taste the separate components (basically, the two "mother" sauces) as you go along, but even so, it will be incredibly difficult to imagine how they'll taste when they're finally wedded together. But when they are, they fit perfectly. A recipe that keeps even an experienced cook guessing until the very end? That's certainly my idea of birthday fun.


Chicken Mole Poblano

Adapted from Rick Bayless via Saveur
Serves 15 - 20

A few notes about this recipe. You'll need to visit a Mexican grocery store to get a number of the ingredients (the dried chiles, the Mexican chocolate, and possibly the tortillas). You'll need access to a few appliances: a spice/coffee grinder and, if you want to cut your labor load (as I did), a food processor. I condensed a few of the steps in Bayless's recipe to make things go a little faster. The amount of oil called for seems like a lot, but you'll need it all, because many of the ingredients get fried. You can pour off whatever seems like excess later on.

Ingredients:

- 12 dried ancho chiles
- 12 dried guajillo chiles
- 6 dried pasilla chiles
- 6 tbsp. sesame seeds
- 1 tsp. whole aniseed
- 1 tsp. black peppercorns
- 1⁄2 tsp. whole cloves
- 1 tsp. dried thyme
- 1⁄2 tsp. dried marjoram or oregano
- 3 dried bay leaves, crumbled
- 1 1⁄2" stick cinnamon, broken into pieces
- 2 cups canola oil
- 7 1⁄4 cups chicken or turkey stock
- 1⁄2 cup skin-on almonds
- 1⁄2 cup raw shelled peanuts
- 1⁄3 cup hulled pumpkin seeds
- 1⁄3 cup raisins
- 2 slices white bread
- 2 stale corn tortillas
- 10 cloves garlic, peeled and smashed
- 2 medium onions, peeled and chopped
- 5 tomatillos, husked, rinsed, and halved
- 2 large tomato, quartered
- 12 whole chicken legs, skin removed and separated into thighs and drumsticks
- Kosher salt, to taste
- 1 cup finely chopped Mexican chocolate
- 4 tbsp. sugar, plus more to taste
- Tortillas, plain white rice and cilantro sprigs, for serving

Preparation:

1. Stem chiles and shake seeds into a bowl. Set chiles aside. Measure 4 tbsp. chile seeds (discard the rest) and 4 tbsp. sesame seeds into a small skillet set over medium heat. Toast seeds, swirling pan, for 2 minutes. Transfer to a spice grinder. Toast aniseed, peppercorns, and cloves; transfer to grinder along with thyme, marjoram, bay leaves, and cinnamon. Grind into a powder and transfer to a large bowl; set spice mixture aside.

2. Heat oil in an 8-quart Dutch oven set over medium heat. Working in small batches, add chiles and cook, turning, until toasted, about 20 seconds. Using a slotted spoon and reserving oil in skillet, transfer chiles to paper towels to drain. Transfer fried chiles to a large bowl; add boiling water to cover (about 4 cups). Let chiles steep for 30 minutes. Strain chiles, reserving soaking liquid.

3. Place the chiles, 3⁄4 cup soaking liquid, and 3⁄4 cup stock into the bowl of a food processor; blend until smooth. Set a sieve over a bowl and strain chile mixture, pushing it through sieve with a rubber spatula; discard solids. Rinse food processor; set chile purée aside.

4. Return pan with oil to medium heat. In quick succession, fry the almonds, then peanuts, then pumpkin seeds, then raisins until toasted, about 1 minute from the time you add the almonds. Transfer all ingredients to paper towels to drain. Return pan to medium heat and fry the bread, turning once, until golden brown, about 3 minutes; transfer to paper towels. Repeat with tortillas. Break bread and tortillas into small pieces and transfer to bowl, along with the almonds, peanuts, pumpkin seeds, raisins, and ground spice mixture; set aside.

5. Set a fine strainer over a large bowl. Strain oil and return it to Dutch oven. Remove 2 tbsp. of the oil and heat it in an 8” skillet set to medium-high. Place onions, garlic, tomatillos and tomatoes into the bowl of the food processor; pulse until finely chopped. Rinse food processor. Add mixture to skillet and cook, stirring, until mixture has softened and the liquid has evaporated, about 12 minutes. Transfer to bowl with spice mixture along with 2 1⁄2 cups stock. Blend onion/nut/spice mixture in food processor until smooth. Press through the strainer into a bowl; set purée aside.

6. Heat reserved Dutch oven over medium-high heat. Season chicken pieces with salt. Working in batches, brown each piece, turning once. Transfer chicken to a plate. Pour off all but 3 tbsp. of oil in Dutch oven and return to medium-high heat. Add chile purée; cook, stirring, until thick, 10–12 minutes. Add spice purée, reduce heat, and cook, stirring, for 30 minutes. Stir in 4 cups stock and chocolate; simmer, partially covered and stirring often, for 1 hour. Season mole sauce with salt and sugar to taste; remove from heat.

7.
Heat oven to 350°. Nestle chicken in mole sauce, dividing among oven-safe dishes if necessary. Bake, covered, for 2 hours. Remove from oven and sprinkle with remaining sesame seeds; serve with tortillas, white rice, and cilantro sprigs.