Showing posts with label party. Show all posts

Monday, February 13, 2012

More fun with chickpeas

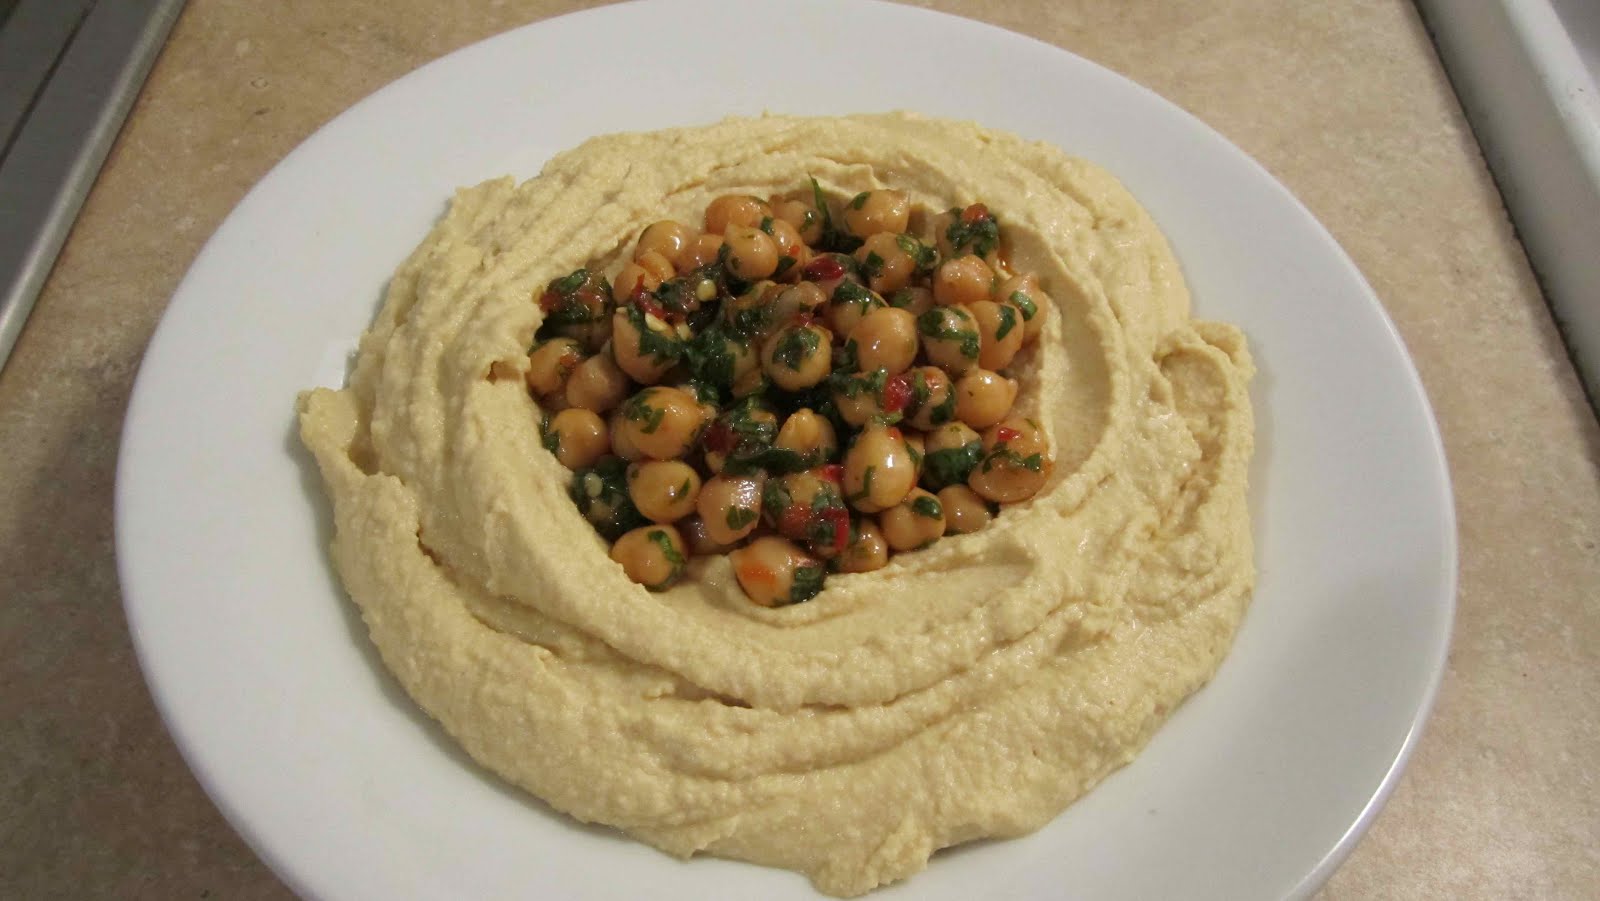
My friend Mathilde's birthday was last Friday, and we had a small party to celebrate. As is usual, when we gather at Willy's house, food played a supporting starring role. As a sort of group effort, we all pitched in to make a big pot of tortilla soup with all the fixins, Willy made another ridiculously intricate and delicious layer cake, and I decided to contribute some hummus that I prepared at home earlier in the day. Inspired by my recent success cooking with dried, soaked chickpeas, I decided to go that route with my hummus, in lieu of canned garbanzos. I soaked and cooked some more chickpeas, then drained them, reserving the cooking liquid. I tipped most of the legumes into my food processor, keeping back about a cup of them, and made my standard hummus by adding garlic, tahini, lemon juice, olive oil and some of the cooking liquid. After tasting and adjusting the flavors to my liking, I let the food processor run for a long time, whipping the hummus into a dense, silky purée. The dried chickpeas contribute a better texture and a fuller flavor to the spread.

My favorite part about this dish, though, is what I decided to do with the remaining, whole chickpeas. Recalling a recent trip to Mimi's Hummus in Ditmas Park, where I ate a fava bean hummus garnished with some whole favas, I knew that I wanted some textural contrast in my hummus. So I marinated the remaining chickpeas in a mix of sambal oelek (my favorite all-purpose hot sauce--you can use sriracha, harissa, or whatever chile paste you prefer), olive oil, and chopped fresh cilantro and parsely. When I served the hummus, I made a well in the spread and lay the whole chickpeas in the middle. The super smooth hummus, broken up by the toothsome whole chickpeas, makes a winning legume-on-legume combination:


Hummus with Whole Marinated Chickpeas

Serves 8 - 10 as an appetizer

Ingredients:

- 1 1/2 c. dried chickpeas, soaked overnight then cooked for about 1 hour, or until soft, drained, cooking liquid reserved--or use about 3 c. canned
- 2 cloves garlic, smashed and peeled
- About 2 tbsp. tahini
- The juice of about 2 lemons
- About 4 tbsp. cooking liquid
- About 4 tbsp. olive oil, plus more for marinated chickpeas
- Salt, to taste
- About 1 tbsp. hot chile paste such as sambal oelek, sriracha, or harissa
- 1 - 2 tbsp. chopped fresh parsley, cilantro or both

Preparation:

1. Add all but about 3/4 c. chickpeas to bowl of a food processor. Add garlic and pulse to combine.
2. Add tahini, lemon juice and salt and turn machine on. As it is running, pour the cooking liquid and olive oil in through the spout on top. Check for seasoning, adjusting as needed, then leave machine running for about 3 minutes so that hummus becomes very smooth.
3. In the meantime, prepare the marinated chickpeas: combine them with the chile paste, about 1 tbsp. of additional oil, fresh herbs, and salt. If possible, let marinate for 30 minutes to an hour.
4. When ready to serve, spread hummus into a shallow bowl and create a well in the middle. Add marinated chickpeas, drizzle with additional olive oil, and serve.

Wednesday, October 26, 2011

Dark and spicy, rosy and puckery

Well, it's not yet my birthday (although we're not too far off), but already this year I've had the occasion to make one of my favorite festive dishes, the crowd-nourishing slow-cooked pork shoulder. This time, the occasion was a fête to celebrate the arrival of fall (and the last chance to have a big gathering on our huge deck 'afore the weather turns too crisp). Though my roommates and I declared our shindig a potluck, experience has taught us that cooking the bulk of the meal is probably a safe bet if one actually wants to eat something approximating a dinner (fact: most people like to bring beer as their potluck dish). And that was a o.k. by me; I love cooking for a group. While my roommate Dave slaved over a labor-intensive (and delicious) veggie lasagna, I stuck my pork roast in the oven and called it a day.

Well, not quite; it's hard for me to let myself off too easy when I cook (I'm working on it). Having decided to prepare the meat in the Puerto Rican style pernil, as opposed to going for the Southern comfort of the BBQ pulled pork I also sometimes make, I opted to serve the finished product in corn tortillas, as tacos. Clearly, I needed some condiments to go with. And it just so happened that days earlier I had noticed some mighty fine-lookin' tomatillos at the Co-op, and thought about how I had never cooked with them before. Immediately, salsa verde, that vibrant, often incendiary Mexican preparation came to mind. One down, one to go; in addition to heat, my tacos would need some crunch. Given my recent obsession with canning, I decided that a quick pickle of red onions was the way to go.

For the onions, I used a simple recipe from Epicurious; in addition to the onions, it calls for exactly three ingredients: apple cider vinegar, water, and salt. It takes about five minutes to throw together; I bet you could make it right now. Go ahead, then! Need a further push? Just look at how pretty the finished pickle looks, all glowing and rosy pink:


For the salsa, I adapted a recipe from Bon Appétit; similarly approachable, it called for the tomatillos to be boiled together with a few jalapeños, then whirled in a blender with fresh parsley, cilantro and mint, and not a small amount of garlic. Looking for a clean flavor, I left out the dried cumin the recipe called for; I also found the finished salsa to be lacking in acidity, and corrected that with both apple cider vinegar and a squeeze of fresh lime juice. I see that Bon Appétit didn't post a photo of the salsa, and neither will I; its hue wasn't exactly appetizing. But piled together with the pork and pickled onions, I doesn't look half bad; nay, the colors are almost complementary:


Pickled Red Onions
Adapted from epicurious.com
Makes about 2 cups

Ingredients:

- 2 red onions, sliced into half-moons
- 1 c. apple cider vinegar
- 1 tsp. salt
- Water

Preparation:

1. Bring a small pot of water to a boil. Blanch the onions for one minute, then drain and shock in an ice bath. Drain again.
2. Return onions to the pot and add the vinegar, salt, and enough cold water to just cover the onions. Bring mixture to a boil and simmer one minute; transfer onions and brine to glass jars and let cool. Note: if planning to can (preserve) the onions, you will need to sterilize the jars. Canned onions keep indefinitely; if not preserving, transfer the jars to the refrigerator, where they will keep for about a month.


Salsa Verde
Adapted from bonappetit.com
Makes about 4 cups

Ingredients:

- 3
lbs. tomatillos, husked, rinsed

- 2
large jalapeños, stems (but not seeds) removed

- 5
garlic cloves, peeled

- 1 bunch fresh cilantro, thick bottom stems trimmed
- 1/2 bunch fresh parsley, thick bottoms stems trimmed

- Handful
fresh mint leaves

- 1 1/2
tbsp. vegetable oil

- About 1 tbsp. apple cider vinegar
- Juice of 1 lime
- About 1 1/2
tsp. salt

Preparation:

1. Place tomatillos and jalapeños in a large pot, cover with water, and bring to a boil. Drop to a simmer and let cook until tomatillos are soft, about 15 minutes. Drain.
2. Place tomatillos and
jalapeños in the bowl of a blender or food processor. Add garlic and herbs, and pulse to combine, then let run until smooth.
3. Return mixture to the pot, add oil and let simmer for 5 - 10 more minutes, until salsa thickens. Remove from heat. Add cider vinegar, lime juice and salt; taste and correct seasoning. Let cool and serve.

Thursday, May 27, 2010

Potluck, please

I don't know about you all, but I love potlucks. I love hosting them; I love attending them; I even like just talking about them. As much I enjoy eating in restaurants every once in a while, dining out has never really been my thing. That's because my favorite kind of food is the simple, comforting, homey kind; the kind, say, that my friends might make for me. Plus, I've always been a sucker for dim sum/Indian buffet/smörgåsbord-type situations, where you get to try lots of different dishes all at once. So, as you can see, potlucks basically represent the sweet, sweet center of my personal Venn diagram of dining.

I've been fortunate in life, I suppose, because I happen to have found a set of friends who share my passion for potlucks. My pal Patricia, who sadly lives in France nowadays, used to host them in her Brooklyn apartment with some regularity, and a coworker of mine has themed potlucks at her house about once a month. Most recently, though, it was my friend Hallie who invited people over to her new place in Williamsburg for a housewarming potluck.

When deciding what to bring to a potluck, there are a few factors to take into consideration. The obvious one is size: you want to make something that will feed a large group. Another is broadness of appeal: a potluck is not the time to try out that recipe for wasabi-sriracha snails you've been eying. Finally, you'll want to think about portability: if you, like me, are riding your bike or even taking the train to your destination, you don't want to prepare something ultra-delicate that will suffer from transportation.

When choosing my potluck dish this time around, I was inspired, as I so often am, by leftovers. I had a box of phyllo dough that had, funnily enough, been hanging around in my freezer since the last potluck I attended, when I made an Austrian potato strudel. In my fridge, I found some slightly sad-looking shiitake mushrooms that needed to be cooked immediately. Lastly, I had purchased a huge bunch of beautiful fat leeks at the farmer's market, and I wanted to spare them the shiitakes' fate and make sure to use them while they were still in their prime. It was obvious to me, once I considered my options, how all these items would go together: in a rich, savory tart.

I sauteed the leeks and shiitakes together, adding some button mushrooms to fill the mixture out, let that cool, and then folded it into some ricotta cheese, adding grated Parmesan and fresh thyme to tie it all together. Once the filling was done, I set to work on my phyllo, laying out the sheets on a large, clean workstation and covering them with a damp towel. After brushing each sheet with a mixture of melted butter and olive oil, I layered them in a shallow glass baking dish, then spread the filling on top. I added several more sheets of phyllo dough, slid the tart into the oven, and in about 40 minutes had a crispy, golden, delectable-smelling pastry cooling on my countertop. I got to tuck into it a few hours later at the potluck, and it was delicious: the earthy, slightly chewy mushrooms breaking up the soft bland richness of the ricotta, the caramelized leeks adding sweetness and just a little bit of bite. If you try it out for your next potluck, don't expect to bring home any leftovers.


Savory Leek, Mushroom and Ricotta Tart
Serves 10

Ingredients:

1 box prepared phyllo dough, thawed
1/2 cup + 3 tbsp. olive oil, divided
3 tbsp. + 1 tbsp. unsalted butter, divided
1 cup shiitake mushrooms, cleaned, stems discarded, and cut into bite-size pieces
1 cup button mushrooms, cleaned and cut into bite-size pieces
4 - 5 leeks, sliced into half-moons and rinsed of all grit
1 small (15 oz.) container ricotta cheese
1 egg
Grated Parmesan
Chopped fresh thyme
Salt
Pepper

Preparation:

1. Preheat the oven to 375
°.
2. In a small pot, melt 3 tbsp. butter, then mix in 1/2 c. olive oil. Set aside to cool.
3. In a large, wide, heavy-bottomed skillet, heat remaining olive oil and butter over a medium flame. Add leeks and mushrooms and cook, stirring occasionally, until leeks are wilted and mushrooms have released their liquid and browned, about 8 minutes. Season with salt and pepper and set aside to cool.
4. Combine mushrooms and leeks with ricotta, egg, Parmesan and thyme to taste. Season with salt and pepper. Set aside.
5. Lay phyllo sheets out on a large, clean workstation and cover with a damp towel. Working with one sheet at a time, brush phyllo generously with oil/butter mixture, then quickly lay it in a 7"x11" glass baking dish. Repeat with 7 more sheets of phyllo.
6. Spread ricotta filling on top of phyllo, distributing evenly.
7. Add a final layer of 8 phyllo sheets on top of the filling, making sure to seal the tart well.
8. Place tart in oven and bake until phyllo is golden brown and crisp, about 40 minutes. Let cool completely, then cut into 10 pieces. Serve at room temperature.

Thursday, January 21, 2010

Birthday fun (with pork)

January 9th marked the 24th year in a row of my existence on this earth, and, also, marked the second year in a row that I chose to celebrate the occasion by feeding a huge, slow-roasted hunk of pork to my friends. For my potluck dinner/birthday party this year, I stuck with pork shoulder because it's a) ridiculously cheap, b) ridiculously easy to make, and c) feeds a ridiculously large number of people. Plus, it's a delicious cut of meat that fills your apartment (and stairwell, and foyer) with a heady, tantalizing, rich aroma during the six to seven hours it spends basting in its own porky juices in your oven. I don't keep many traditions, but I like the fact that one of the few that I observe involves consuming a large section of a pig once yearly.

So I had the pork shoulder, and I prepared it much the same way as the pernil that I made last year, marinating it overnight in a potent blend of chopped garlic and onion, chili powder, olive oil and vinegar. The next day, I slow-roasted it at 300° for, well, the entire day. But after that, all bets were off. I was serving pork shoulder again, but I wanted to mix up my preparation. I decided to convert the pernil into southern-style barbecued pulled pork. I mean, how can you go wrong with that? (Answer: you cannot.) So after six or seven hours when the pork shoulder emerged from my oven glistening with crispy fatty crackling and virtually melting off the bone, I pulled off great big hunks of meat, and, with almost no effort needed at all, shredded them up into long, soft strands. I piled these into a big heavy pot, then folded in a sweet, smokey, homemade BBQ sauce as well as (shhh) a healthy ladle of pork fat drippings that I had rescued from the bottom of the roasting tray. I then turned on the heat again, though this time on top of the stove, letting the pork cook into the sauce over a low heat for about an hour. The pork came out just as I had hoped: moist, tender, and full of sweet and slightly spicy flavor:


And let's not forget the cornbread. After all, what's a southern barbecue without cornbread?


If every year finds me surrounded by good friends and copious amounts of pork, the future looks like a bright one to me!

Southern-Style Barbecued Pulled Pork
Serves 12 - 15 (with leftovers)

Ingredients:

1 pork shoulder, 8 to 10 pounds
4 cloves garlic, peeled
1 large onion, quartered
2 tbsp. fresh oregano leaves or 1 tablespoon dried oregano
1 tbsp. sweet paprika
1 tsp. ancho or other mild chili powder
1 tbsp. salt
2 tsp. freshly ground black pepper
Olive oil as needed
1 tbsp. wine or cider vinegar
1 recipe Sweet and Smokey BBQ Sauce (see below)
Reserved pork drippings, as needed

1. Score meat’s skin with a sharp knife, making a cross-hatch pattern. Pulse garlic, onion, oregano, paprika, chili, salt and pepper together in a food processor, adding oil in a drizzle and scraping down sides as necessary, until mixture is pasty. (Alternatively, mash ingredients in a mortar and pestle.) Blend in the vinegar.
2. Rub mixture into pork, getting it into every nook and cranny. Cover with plastic wrap and place in fridge. Let marinate for 12-24 hours.
3. Heat oven to 300 degrees. Remove plastic wrap from pork and place in a roasting pan, filling the bottom with about a half inch of water. Roast pork for as long as you can, or six to seven hours (you cannot really overcook it), covering the skin with foil if it starts to burn. Remove foil before cooking time is over to allow skin to crisp well.
4. Let meat rest for 10 to 15 minutes, then pull off pork cracklings (serve these with lime, hot sauce or both. You won't be disappointed). Using your hands, tear all pork meat off bone in big chunks. When all meat is removed from the bone, shred it into a large, heavy pot, using either your hands or two forks--either way, this is a messy job.
5. Fold in the majority of the homemade BBQ sauce, as well as a good ladleful of pork juice and drippings reserved from the bottom of the roasting pan. Cook, covered, over low heat, or until pork is completely soft and tender and has absorbed a good deal of the sauce, about 1 hour. Taste and add more BBQ sauce, drippings, or seasoning as needed.


Sweet and Smokey BBQ Sauce
Makes about 3 cups

Ingredients:

2 cups ketchup
7 tbsp. apple cider vinegar
2 tbsp. water
Juice of 1 lemon
2 tbsp. Worcestershire sauce
12 dashes Tabasco sauce
1 tbsp. Dijon mustard
1 tsp. chili powder
1 tsp. sweet or smoked paprika
3/4 c. dark brown sugar or more, to taste
3 cloves garlic
2 chipotles en adobo plus 2 tbsp. adobo sauce
1 tsp. salt
Ground pepper to taste

1. Combine all ingredients in a heavy saucepan and bring to a simmer. Cook for 45 minutes or until sauce has thickened, stirring often to prevent burning and adding more water as necessary.
2. Puree until smooth with a stick blender. Taste for seasoning, adding more brown sugar or salt as necessary.


Skillet Cornbread
Adapted from epicurious.com
Makes 1 loaf

Ingredients:

1 c. all-purpose flour
1 tbsp. baking powder
1/2 tsp. salt
1 c. yellow cornmeal
1/4 c. sugar
1 c. milk
1 large egg
1 sticks (1/2 c.) unsalted butter

1. Preheat oven to 375°. Place several small pats of butter into a large cast iron skillet and place skillet in the oven. (If you do not have a cast iron skillet, butter a large, shallow glass baking dish and set it aside.)
2. Melt remaining butter in a small saucepan over medium-low heat.
3. In a large bowl whisk together flour, baking powder, salt, cornmeal and sugar.
4. In another bowl, whisk together melted butter, egg, and milk. Pour the wet ingredients into the dry and stir until just combined. Batter will be thin.
5. Remove skillet from oven and pour in the batter. Place in middle of oven and bake until golden brown and cooked through, about 35 minutes. Remove skillet from oven and cool on a wire rack.

Wednesday, March 18, 2009

Blog's first birthday

It's true: For the Love of Food turned one year old yesterday. Since March 17, 2008, I've graduated from college, moved into my first apartment, completed one internship at a food magazine and started another--and through it all, I've kept cooking and writing in this space. I think that's pretty great. I haven't always written as often or as well as I would have liked, but what's important is that I've stuck around--and you've stuck around, reader, whoever you might be. Thanks for that; please keep coming back for another year.

I figure that since it's a birthday here on Blogspot I might as well share a cake with you. I haven't made one recently, but, digging into my photo archives, I found an image of a chocolate layer cake frosted with peanut butter ganache that I made for my friend Malcolm's birthday party back in January. If you like peanut M&M's, Reese's peanut butter cups and the like, then this cake is definitely for you. Both of its components deliver on the promise of intense flavor: the cake, made from a recipe from an old Hershey's pamphlet that my mom has had lying around forever, has been my standard birthday cake for, oh, twelve years or so. It's called Black Magic Cake, and there's definitely something magical about it: incredibly moist, fluffy but rich at the same time, this cake packs a powerful hit of cocoa--and a subtle hint of coffee--in every bite. For the peanut butter frosting, which I had never made before, I turned to the doyenne of simple, elegant baking: Ina Garten, the Barefoot Contessa herself. She didn't let me down. Her recipe takes sugar, peanut butter, butter, vanilla, salt and heavy cream, and turns them into a thick, oozing, coat-your-spoon (and lips, and fingertips) ganache that nevertheless manages to heighten--not obscure--the flavor of the chocolate in the cake. Consider this combination for the next birthday in your life--whether you're celebrating a website or, you know, a real person.


Black Magic Cake
Adapted from hersheys.com
Makes two 9" cake layers

Ingredients:

1 3/4 cups unsifted flour
2 cups sugar
3/4 cup cocoa
2 tsp. baking soda
1 tsp. baking powder
1 tsp. salt
2 eggs
1 cup strong coffee
1 cup buttermilk or sour milk (1 tbsp. white vinegar or lemon juice plus milk to equal 1 cup)
1/2 cup vegetable oil
1 tsp. vanilla

Directions:

1. Preheat the oven to 350°. Grease and flour two 9-inch round baking pans, tapping out excess flour.
2. Stir together sugar, flour, cocoa, baking soda, baking powder and salt in large bowl. Add eggs, buttermilk, coffee, oil and vanilla; beat on medium speed of mixer for 2 minutes (batter will be thin). Pour batter evenly into prepared pans.
3. Bake for 30 - 35 minutes or until toothpick inserted into center comes out clean. Let cool for 15 minutes; remove from pans to wire racks and cool completely. Frost as desired.


Peanut Butter Ganache
Adapted from the Barefoot Contessa
Makes about 4 cups

Ingredients:

1 cup confectioners' sugar
1 cup creamy peanut butter
5 tbsp. unsalted butter, at room temperature
3/4 tsp. pure vanilla extract
1/4 tsp. kosher salt
1/3 cup heavy cream

Directions:

Place the confectioners' sugar, peanut butter, butter, vanilla, and salt in the bowl of an electric mixer fitted with a paddle attachment. Mix on medium-low speed until creamy, scraping down the bowl with a rubber spatula as you work. Add the cream and beat on high speed until the mixture is light and smooth.

Sunday, January 11, 2009

Happy birthday to me

It was my birthday on Friday and to celebrate I did what most any foodie would do: cooked a meal for about 15 people. Sounds stressful, right? Well, it wasn't. When planning my party I tried to come up with some food options that would be cheap, easy and plentiful enough to feed a crowd. Suddenly I hit upon a winning idea: slow-roasted pork shoulder, also known as pork butt (how appealing). Since I've moved to my neighborhood of south Park Slope, I've been intending to take better advantage of the many Latin American ingredients available in the supermarkets around here: things like fresh cactus, a variety of fresh and dried chiles, and, most prominently, pork--in all its shapes, sizes and cuts. I'm talking trotters, pork kidneys, pork ribs, and, yes, pork shoulder. Because I don't tend to follow recipes, though, I also tend not to purchase ingredients that are unfamiliar to me, because I don't have an instinct for how to cook them. But I decided that my birthday would be the perfect occasion to break this bad habit, so I went whole-hog (ha, ha), buying a 10-pound pork shoulder and preparing it in the Puerto Rican style called pernil.

Pork shoulder is a tough cut of meat that becomes tender and succulent after many hours of low-temperature cooking, like braising on the stovetop or roasting in the oven. Because it's not a very "desirable" piece of meat, it's also very inexpensive--I got it at my local Met supermarket for $1/lb. A dollar a pound! Do the math and you'll see that that means that I fed more than 15 people for about $10. Not bad.

To learn how to prepare the pernil I looked at a number of recipes online and eventually settled on Mark Bittman's version. A New York Jew is perhaps not the most authentic source for a Puerto Rican recipe, but his method was the most simple and, after all, I didn't want to be stressed on my own birthday. The basic preparation is as follows. A day before you intend to cook the pernil, score its layer of fat and rub the whole thing with a strongly-flavored marinade made of chopped onions, garlic, cumin and chile powder. Wrap the meat in plastic wrap and set it in the fridge. When you wake up the next morning, turn your oven to 300° and put the pork in. Then you can basically forget all about it. Other than turning the pan every hour or so and making sure that the fat isn't burning--and covering the roast with tin foil if it is--you don't have to do anything but sit back and enjoy the intoxicatingly porky aromas that will fill your apartment, and, odds are, your entire apartment building. Around dinner time, remove the pork from the oven and let it rest for about 15 minutes. Then you can simply shred the meat into long, tender strands with a fork--it falls apart completely.

Pernil would be excellent served alongside rice and beans and a salad (to cut the richness of the fatty meat), but to keep things simple I chose to serve mine with two easy salsas: a basic tomato pico de gallo and a corn and black bean salsa (special thanks to Willy for his cilantro-chopping skills). With some warm corn tortillas on the side, it was a filling, satisfying meal that was perfect for the occasion.


Pernil
Adapted from nytimes.com
Makes at least 6 servings

Ingredients:

1 pork shoulder, 4 to 7 pounds (or use fresh ham)
4 or more cloves garlic, peeled
1 large onion, quartered 2 tablespoons fresh oregano leaves or 1 tablespoon dried oregano
1 tablespoon ground cumin
1 teaspoon ancho or other mild chili powder
1 tablespoon salt
2 teaspoons freshly ground black pepper
Olive oil as needed
1 tablespoon wine or cider vinegar Lime wedges for serving

Preparation:

1. Score meat’s skin with a sharp knife, making a cross-hatch pattern. Pulse garlic, onion, oregano, cumin, chili, salt and pepper together in a food processor, adding oil in a drizzle and scraping down sides as necessary, until mixture is pasty. (Alternatively, mash ingredients in a mortar and pestle.) Blend in the vinegar.

2. Rub this mixture well into pork, getting it into every nook and cranny. Cover with plastic wrap and place in fridge. Let marinate for 12-24 hours.

3. Heat oven to 300 degrees. Remove plastic wrap from pork and place in a roasting pan, filling the bottom with about a half inch of water. Roast pork for several hours (a 4-pound shoulder may be done in 3 hours), turning every hour or so and adding more water as necessary, until meat is very tender. Finish roasting with the skin side up until crisp, raising heat at end of cooking if necessary.

4. Let meat rest for 10 to 15 minutes before cutting it up; meat should be so tender that cutting it into uniform slices is almost impossible; rather, whack it up into chunks. Serve with lime.

Pico de Gallo
Makes about 3 cups

Finely dice 6 ripe plum tomatoes and place in a large bowl. Add one large white onion, finely diced, 3 cloves of garlic, minced, one bunch of finely chopped cilantro, 1-2 jalapeños, minced, the juice of 2-3 limes, and plenty of salt. Mix well and taste to adjust seasoning.

Corn and Black Bean Salsa
Makes about 4 cups

Open a 15.5 oz. can of black beans; rinse them of their liquid and drain well. Place in a large bowl. Add half a 10 oz. bag of thawed frozen corn, half a large white onion, finely diced, one bunch of finely chopped cilantro, the juice of 2-3 limes, and plenty of salt. Mix well and taste to adjust seasoning.